Showing posts with label Keeping Christmas. Show all posts

Wednesday, November 25, 2020

Keeping Christmas-November 2020


It's time for the November Keeping Christmas blog hop! Kelly Lunceford started this many months ago and eventually the former team of "The Challenge" designers came to be a part of it.  We share holiday cards and projects with you on the 25th of each month to show you different ideas, techniques or projects to help you get a jump start on your holiday cards and tags for the coming year.  All of the designers have projects to share with you today. You'll find a list of the participating designers at the bottom of my post so you can stop by and admire their creativity while collecting some ideas for your holiday card creating.  

'Tis the Season to Be Jolly card-designed by Lori Tecler/Inking Aloud-stamps from Paper Smooches
The layout for my design comes from the current Mojo Monday sketch.  The sketch was perfect for the large shimmery white snowflakes I created with the Paper Smooches Huge Snowflakes dies.   The flakes were positioned at the top of a warm and cozy plaid patterned paper panel.  For even more sparkle and shine, I dotted with the center of each flake with a clear crystal.  I adhered a kraft strip, edged along the bottom with a narrow strip of gold foil cardstock, beneath the flakes.  The panel was wrapped with red seam binding and secured with a simple knot.  I stamped the "'tis the season to be jolly" sentiment from the Papertrey Ink 'Tis the Season Sentiments set in red ink on a white circle. The circle was matted on a slightly larger red circle, then placed on the kraft panel to complete a visual triangle on the cardfront.  The finished panel was adhered to a red card base matching the mat beneath the sentiment panel.

Don't miss what the rest of our team has created to inspire you to get a head start on your holiday card making!  There is a lot of inspiration and ideas to get your creative juices flowing.  Here's where to find the team members:

Lori Tecler - you're here!

Materials Used:
Tis the Season Sentiments stamp set (Papertrey Ink); Rhubarb Stalk ink (Tsukineko/IMAGINE Crafts); Kraft cardstock (Papertrey Ink); Riding Hood Red cardstock (Stampin' Up!);  Crystal Stardream metallic cardstock (The Paper Cut); Gold Foil cardstock, Christmas Plaids 6x6 patterned paper pad (Recollections); Huge Snowflakes dies (Paper Smooches); circle dies (Spellbinders); red seam binding (Martha Stewart); clear self-adhesive crystals

Sunday, October 25, 2020

Keeping Christmas-October 2020


It's time for the October Keeping Christmas blog hop! Kelly Lunceford started this many months ago and eventually the former team of "The Challenge" designers came to be a part of it.  We share holiday cards and projects with you on the 25th of each month to show you different ideas, techniques or projects to help you get a jump start on your holiday cards and tags for the coming year.  All of the designers have projects to share with you today. You'll find a list of the participating designers at the bottom of my post so you can stop by and admire their creativity while collecting some ideas for your holiday card creating.  

Merry and Bright card-designed by Lori Tecler/Inking Aloud-stamps from My Favorite Things
My card for this month's hop was inspired by the current sketch at Sunday Stamps.  I used the Let it Snow dies from Reverse Confetti to cut a pair of sparkly silver glitter snowflakes for my focal panel. The flakes were dotted with clear crystals at their centers before I arranged them on a pale pink cardstock panel. The panel was matted on red cardstock, then adhered to a piece of red patterned paper with a cozy argyle pattern.  I stamped the "may your days be merry and bright sentiment from the My Favorite Things Merry & Bright stamp set on a long banner strip in black ink. The strip was placed beneath the snowflake pair using foam tape for dimension. The finished panel was adhered to a red card base to match the sentiment strip.

Don't miss what the rest of our team has created to inspire you to get a head start on your holiday card making!  There is a lot of inspiration and ideas to get your creative juices flowing.  Here's where to find the team members:

Lori Tecler - you're here!

Materials Used:
Merry & Bright stamp set (My Favorite Things); Memento Tuxedo Black ink (Tsukineko/IMAGINE Crafts); Pink Pirouette cardstock (Stampin' Up!); Red Punch and Silver Glitter cardstock (Recollections); designer paper (Lawn Fawn); Let it Snow and Tag Me dies (Reverse Confetti); clear self-adhesive crystals; foam tape

Friday, September 25, 2020

Keeping Christmas-September 2020


It's time for the September Keeping Christmas blog hop! Kelly Lunceford started this many months ago and eventually the former team of "The Challenge" designers came to be a part of it.  We share holiday cards and projects with you on the 25th of each month to show you different ideas, techniques or projects to help you get a jump start on your holiday cards and tags for the coming year.  All of the designers have projects to share with you today. You'll find a list of the participating designers at the bottom of my post so you can stop by and admire their creativity while collecting some ideas for your holiday card creating. 

Here's my creation for this month's hop.  The layout was inspired by the current sketch at Try Stampin' on Tuesday.  I found some pretty patterned paper with large scale snowflakes in my scrap pile and thought it would make a pretty background for a large sentiment panel. My sentiment is from Avery Elle's Sending Peace stamp set.  I stamped the text in silver ink on a red cardstock panel before heat embossing it in silver for an extra pop.  The panel was matted on black cardstock before I adhered it to the patterned paper panel over narrow strips of black and silver cardstock. I used foam tape for dimension and so I could tuck the ends of the clear crystal flourishes I used as accents underneath the raised panel. The finished panel was adhered to a red card base matching the sentiment panel.

Don't miss what the rest of our team has created to inspire you to get a head start on your holiday card making!  There is a lot of inspiration and ideas to get your creative juices flowing.  Here's where to find the team members:

Lori Tecler - you're here!

Materials Used:
Sending Peace stamp set (Avery Elle); Delicata Silvery Shimmer ink ( Tsukineko/IMAGINE Crafts); Real Red and Basic Black cardstock (Stampin' Up!); Silver cardstock, clear crystal flourishes (Recollections); Ornaments-Season's Greetings designer paper (Echo Park); silver embossing powder (Hero Arts); Pierced Rectangle STAX dies (My Favorite Things); foam tape

Tuesday, August 25, 2020

Keeping Christmas-August 2020

 It's time for the August Keeping Christmas blog hop! Kelly Lunceford started this many months ago and eventually the former team of "The Challenge" designers came to be a part of it.  We share holiday cards and projects with you on the 25th of each month to show you different ideas, techniques or projects to help you get a jump start on your holiday cards and tags for the coming year.  All of the designers have projects to share with you today. You'll find a list of the participating designers at the bottom of my post so you can stop by and admire their creativity while collecting some ideas for your holiday card creating.

Sending Holiday Cheer card-designed by Lori Tecler/Inking Aloud-stamps and dies from WPlus9
Here's my contribution to today's hop.  I inked up some winter wear from WPlus9's Holiday Cheer stamp set to serve as the focal image on this layout inspired by the current challenge at Try Stampin' on Tuesday. The fingerless gloves and pom pom topped hat were stamped in white pigment ink on red cardstock, then heat embossed for a crisp pop of white to really show off the detail in the images.  I used the matching dies to cut out the embossed images.  After stringing the gloves together with some twine, I used foam tape to arrange the pieces on a cream cardstock circle. To go with the images, I embossed a panel of red cardstock with a knit pattern that the mittens and hat would have in real life. The textured panel was adhered to a kraft card base on an angle.  I added a wide strip of plaid patterned paper on top of the textured piece, anchoring it with a shiny strip of gold washi tape along the right edge. The image panel was adhered on top.  I stamped the set's "sending holiday cheer" sentiment on a kraft panel.  After rounding the edges of the panel, I tucked it beneath the left side of the image panel to complete the card.

Don't miss what the rest of our team has created to inspire you to get a head start on your holiday card making!  There is a lot of inspiration and ideas to get your creative juices flowing.  Here's where to find the team members:

Lori Tecler - you're here!

 
Materials Used:
Holiday Cheer stamp set, Holiday Cheer dies (WPlus9); Memento Luxe Wedding Dress and Memento Rhubarb Stalk inks (Tsukineko/IMAGINE Crafts); Kraft cardstock (Papertrey Ink); Red Punch cardstock, Cozy Lodge 6x6 paper pad, Snow embossing powder (Recollections); Cable Knit embossing folder (Sunny Studio); circle die (Spellbinders); twine (Hemptique); gold washi tape; corner rounder; foam tape

Saturday, July 25, 2020

Keeping Christmas - July 2020


It's time for the July Keeping Christmas blog hop! Kelly Lunceford started this many months ago and eventually the former team of "The Challenge" designers came to be a part of it.  We share holiday cards and projects with you on the 25th of each month to show you different ideas, techniques or projects to help you get a jump start on your holiday cards and tags for the coming year.  All of the designers have projects to share with you today. You'll find a list of the participating designers at the bottom of my post so you can stop by and admire their creativity while collecting some ideas for your holiday card creating.

Christmas Cheer card-designed by Lori Tecler/Inking Aloud-stamps from The Cat's Pajamas
Here's my project for the hop.  It's based on the current Mojo Monday sketch and shows off one of my favorite characters, the big eared bunny from The Cat's Pajamas.  I had colored this image from the All Is Bright set for this month's Daily Marker 30 Day Coloring Challenge and knew it would be perfect for the focal image on this layout and for TCP's current Christmas in July themed challenge.  The image was colored with Copic markers, then cut out with my Scan 'n Cut machine.  I used foam tape to place the image on a white panel that I matted on contrasting black cardstock.  For the background, I covered most of a red cardfront with a plaid patterned paper panel.  For contrast, I positioned a wide strip of green cardstock along the left side of the panel then layered on a wide strip of red cardstock across the plaid panel.  Each piece was edged with a narrow strip of black cardstock.  The image panel was added on top.  Once it was in place, I stamped the "bringing you Christmas cheer" sentiment from the Believe stamp set beneath the image panel in black ink.

Don't miss what the rest of our team has created to inspire you to get a head start on your holiday card making!  There is a lot of inspiration and ideas to get your creative juices flowing.  Here's where to find the team members:

Kelly Lunceford (Creator)
Claire Broadwater--taking the month off
Lori Tecler - you're here!

Materials Used:
All Is Bright and Believe stamp sets (The Cat's Pajamas); Memento Tuxedo Black ink (Tsukineko/IMAGINE Crafts); markers (Copic); Riding Hood Red and Basic Black cardstock (Stampin' Up!); New Leaf cardstock, Pure Poppy patterned paper (Papertrey Ink); foam tape

Thursday, June 25, 2020

Keeping Christmas - June 2020

It's time for the June Keeping Christmas blog hop! Kelly Lunceford started this many months ago and eventually the former team of "The Challenge" designers came to be a part of it.  We share holiday cards and projects with you on the 25th of each month to show you different ideas, techniques or projects to help you get a jump start on your holiday cards and tags for the coming year.  All of the designers have projects to share with you today. You'll find a list of the participating designers at the bottom of my post so you can stop by and admire their creativity while collecting some ideas for your holiday card creating.

Bringing You Christmas Cheer card-designed by Lori Tecler/Inking Aloud-stamps from The Cat's PajamasHere's my project for the hop.  It's based on the current Mojo Monday sketch and shows off one of my favorite characters, the big eared bunny from The Cat's Pajamas.  The bunny from the Santa Is Coming set was colored up with Copic markers and cut out with my Scan 'n Cut machine.  I used a bit of white flock on the bunny's Santa hat to add some texture, then used foam tape to adhere the image to a white circle.  The sentiment from the All Is Bright stamp set was stamped just beneath the bunny image.  After matting the round panel on a slightly larger kraft circle, I adhered it to a snowflake patterned paper panel with contrasting strips of red plaid patterned paper and red solid paper on it for contrast.  I added a red fishtail flag banner at the top of the panel and accented it with a shiny silver snowflake brad.  The finished panel was adhered to a kraft card base. 

Don't miss what the rest of our team has created to inspire you to get a head start on your holiday card making!  There is a lot of inspiration and ideas to get your creative juices flowing.  Here's where to find the team members:

Lori Tecler - you're here!

Materials Used:
Santa Is Coming and All Is Bright stamp sets (The Cat's Pajamas); Memento Tuxedo Black ink (Tsukineko/IMAGINE Crafts); Kraft cardstock (Papertrey Ink); Red Punch cardstock, Christmas Plaids 6x6 paper pad snowflake brad (Recollections); designer paper (Echo Park); circle dies (Spellbinders); Fishtail Flag STAX dies (My Favorite Things); white flock (Stampendous); foam tape

Monday, May 25, 2020

Keeping Christmas - May 2020


It's time for the May Keeping Christmas blog hop! Kelly Lunceford started this many months ago and eventually the former team of "The Challenge" designers came to be a part of it.  We share holiday cards and projects with you on the 25th of each month to show you different ideas, techniques or projects to help you get a jump start on your holiday cards and tags for the coming year.  All of the designers have projects to share with you today. You'll find a list of the participating designers at the bottom of my post so you can stop by and admire their creativity while collecting some ideas for your holiday card creating.

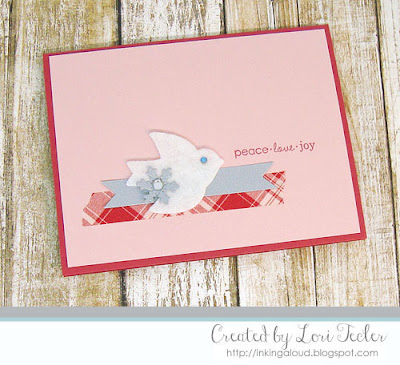
Peace Love Joy card-designed by Lori Tecler/Inking Aloud-stamps and dies from Papertrey InkI used the current sketch from The Paper Craft Crew and some leftovers from a holiday card design I mass produced years ago for this simple, easy to reproduce design.  The "leftover" is the white die cut felt dove.  I used it as the focal image in my design, adhering it to a pink panel over a silver double ended banner strip and a piece of red plaid washi tape.  The dove was accented with a small silver snowflake, rescued from my scrap pile and  dotted with a clear crystal at the center. I stamped the "peace love joy" sentiment from Papertrey Ink's Fillable Frames #8 stamp set to the right of the dove in red ink, then adhered the panel to a red card base to finish the design.  Now that I look at it again, I think I'd like it better if the dove had a clear crystal for its eye, so I may go back and switch it out...

Don't miss what the rest of our team has created to inspire you to get a head start on your holiday card making!  There is a lot of inspiration and ideas to get your creative juices flowing.  Here's where to find the team members:

Lori Tecler - you're here!

Materials Used:
Fillable Frames #8 stamp set, Peace Be Still and Double Ended Banner dies (Papertrey Ink); Memento Rhubarb Stalk ink (Tsukineko/IMAGINE Crafts); Blushing Bride cardstock (Stampin' Up!); Silver cardstock, plaid washi tape (Recollections); Snowflake Lace die (The Cat's Pajamas); blue and clear self-adhesive crystals; foam tape

Saturday, April 25, 2020

Keeping Christmas - April 2020


It's time for the April Keeping Christmas blog hop! Kelly Lunceford started this many months ago and eventually the former team of "The Challenge" designers came to be a part of it.  We share holiday cards and projects with you on the 25th of each month to show you different ideas, techniques or projects to help you get a jump start on your holiday cards and tags for the coming year.  All of the designers have projects to share with you today. You'll find a list of the participating designers at the bottom of my post so you can stop by and admire their creativity while collecting some ideas for your holiday card creating.

Holiday Hugs card-designed by Lori Tecler/Inking Aloud-stamps from Paper SmoochesThe snowmen images from Paper Smooches are some of my favorite winter and holiday themed images ever!  I used one from the Winter Greetings set as my focal image here along with one of the current Mojo Monday sketches.  I stamped the image on white cardstock and colored it with Copic markers, then used my Scan 'n Cut machine to cut out the colored image.  For texture, I added a little white flock to the pom pom on the snowman's hat.  I used foam tape to position the snowman on white snowy hill cut with PS's Stitched dies. The "holiday hugs" sentiment from the Holiday Cheer stamp set was stamped to the left of the image in black ink.  I matted the panel on olive cardstock to match the snowman's hat.  The image was adhered to a light blue cardstock panel over a pair of coordinating patterned paper panels in a classic dots and stripes combination.  The finished card was adhered to an olive card base to tie all the elements together.

Don't miss what the rest of our team has created to inspire you to get a head start on your holiday card making!  There is a lot of inspiration and ideas to get your creative juices flowing.  Here's where to find the team members:


 Vicki Finger -- taking the month off
 

Materials Used:
Winter Greetings and Holiday Cheer stamp sets, Stitched dies (Paper Smooches); Memento Tuxedo Black ink (Tsukineko/IMAGINE Crafts); markers (Copic); Old Olive and Soft Sky cardstock (Stampin' Up!); Crystal Stardream metallic cardstock (The Paper Cut); designer paper (October Afternoon); foam tape

Wednesday, March 25, 2020

Keeping Christmas-March 2020

***  Scroll down to the post below or click HERE to see my card for this week's Color Throwdown challenge! *** 


It's time for the March Keeping Christmas blog hop! Kelly Lunceford started this many months ago and eventually the former team of "The Challenge" designers came to be a part of it.  We share holiday cards and projects with you on the 25th of each month to show you different ideas, techniques or projects to help you get a jump start on your holiday cards and tags for the coming year.  All of the designers have projects to share with you today. You'll find a list of the participating designers at the bottom of my post so you can stop by and admire their creativity while collecting some ideas for your holiday card creating.

All Is Calm card-designed by Lori Tecler/Inking Aloud-stamps and dies from Paper Smooches
Here's my card for this month.  The layout comes from the current Fab Friday Challenge.  The layout's large panel was perfect for showing off the largest snowflake from the Paper Smooches Huge Snowflakes die set.  I cut the flake from silver cardstock and dotted the center with a large clear self-adhesive crystal before using foam tape to adhere it to a red and black checked panel.  The patterned paper panel was matted on coordinating red cardstock, then layered on to a black stitched square die cut, offsetting the square for interest.  I adhered the black square to the to top of a red card base. For the sentiment, I stamped the "all is calm all is bright" sentiment from PS's Holiday Cheer stamp set in black ink on a silver cardstock strip.  The strip was adhered to the bottom of the layered squares using foam tape.


Don't miss what the rest of our team has created to inspire you to get a head start on your holiday card making!  There is a lot of inspiration and ideas to get your creative juices flowing.  Here's where to find the team members:

Kelly Lunceford (Creator) -- taking the month off 
 Lori Tecler -- you're here!

Materials Used:
Holiday Cheer stamp set, Huge Snowflakes dies (Paper Smooches); Versafine Clair Nocturne ink (Tsukineko/IMAGINE Crafts); Riding Hood Red and Basic Black cardstock (Stampin' Up!); Silver cardstock, Cozy Lodge 6x6 paper pad (Recollections); Pierced Square STAX dies (My Favorite Things); clear self-adhesive crystal; foam tape
 
Blogging tips