Tuesday, April 23, 2024
Empire Inlaid Colour Bunch with Concord & 9th
Hello again stampers! Sometimes you’ve just got to go for all the rich saturated colour! Today I did! I recently purchased some wonderful things from Concord & 9th including the Empire Inlaid Card Front Die and this wonderful bouquest set called Flower Medley (Bundle), and then just went for a fun colour combination to create.
The inlay is not complicated, but just takes some time and patience, and honestly there are so many ways you could use this die, simply as texture on a single colour, to intricate arrangments. It’s a scene stealer for sure! I added the pretty scripted sentiment from C & 9th’s Short and Sweet Dies. They are just the perfect size for a card. All the flowers are inked with coordinating inks and then die cut and placed in an arrangement that makes the most of the background.
Thanks for your visit today!
Foiling with Crafty Meraki Two Ways
Hi there! It’s Tuesday and that means another week of guest posting for Crafty Meraki and this week our theme is foiling! So, I’ve brought you TWO very different designs with foiling, a floral and a masculine style design.
First up this gorgeous array of flowers from Crafty Meraki’s very beautiful Elegance Hot Foil Plate and coordinating Stencil. It’s a large sized flower and makes a great statement on a card. I foiled the image twice in gold, once on white cardstock and then a second time on the new Rainbow Canopy Paper Pack.
After trimming the flowers out fussy cutting style, and stencilling in purples shades with ink, I carefully added in a few of the patterned paper leaves into the design paper by paper piecing. Those little pops of colour and pattern are a fun touch. I used some die cut octagons in the background in purple cardstock and pattern paper to die the colours and pattern papers together.
The pretty sentiment is also foiled on purple cardstock from Crafty Meraki’s Handmade Love Hot Foil Plate and coordinating die. These are fun scripty fonts to play with.
Next up is a more masculine style (or maybe better said a more neutral design).
I’m playing with my favourite colour, green! For this design I started with Crafty Meraki’s Evergreen Elegance EAP. This is a type of patterned paper with images that are already coloured, it makes for quick card making, embellishing or an entire design as I created today! I picked a few sheets of coloured leaves that I liked, trimmed them out (though they do have coordinating dies) and combined that with some Olive Leaf Meraki Para-Dies, cut on vellum. Then, because this is a foiling focussed card, I foiled both the sentiment from Meraki Moments Hugs Hot Foil Plate and die Combo in green faceted foil.
To add foiled Olive Leaf die cuts in the arrangement, I foiled a rectangle using a solid foiling plate, and then die cut the foiled olive branches out of that piece of foiled paper. When I found an arrangment I liked, I spread some Press n Seal overtop to hold everything together while I created the background.
The background rectangle is run through the Crafty Meraki Parisienne Mini Slimline Para-Dies for that beautiful impressed pattern, and then I spritzed that layer with water and sprinkled some Lindy’s Magical powders (Pondorosa Pines Olive) onto the layer, spritzed again and all this beautiful pigmented green starts to play!
Then I assembled the card with lots of foam dots to create a good amount of dimension. All that green is so wonderful! A few enamelled dots complete the accents.
Sunday, April 21, 2024
Masculine Monday with Waffle Flower Postage
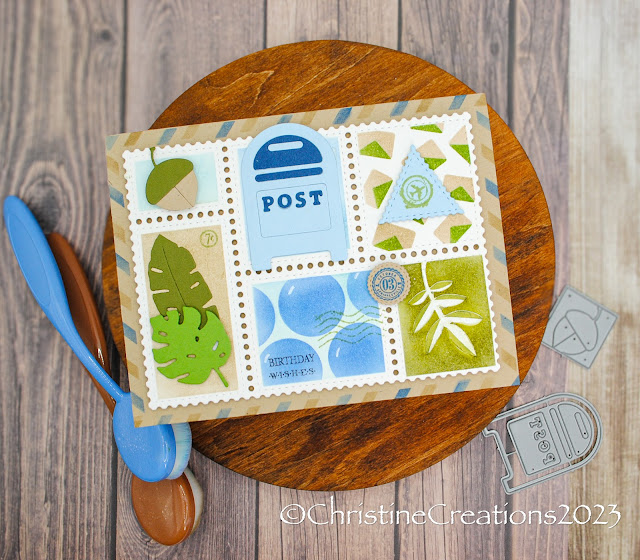
Hello out there! Today I”m bringing you a little masculine inspiration with a number of company’s products, but all based around Waffle Flower’s Postage Collage Bundle. Its such an ingenious way of creating cards! This time I decided to go a little masculine. If there is one style of card I’m usually lacking in its masculine!
I’ve used TCP’s retired postage stamps, and dies (like that fun mailbox and acorn), then stencils from the Waffle Flower set, embossing paste (lower right corner leaves), and dies from Concord & 9th A Bit of Paradise for the tropical leaf dies.
It makes for a perfect masculine design for a Birthday with the blues, greens and neutrals!
Appreciate you joining me!
Wednesday, April 17, 2024
Bye Bye Birdy Postage with TCP
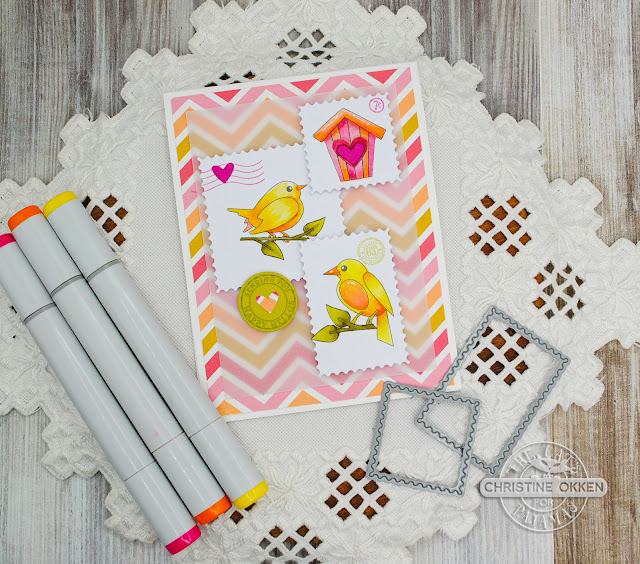
Hello! Today I’m bringing you some of the March Release goodies from The Cat’s Pajamas for a second look. I didn’t get a chance to play with all of the sweet things from the Release, so today I am creating with the Bye Bye Birdy digital set. These sweet little chirpers will steal your heart! This is a creative set that offers both lined bird and birdhouse images as well as images already coloured in to make really quick cards. I pulled out my Copics and brought some sunshiney colour to them.
After adding some white gel pen accents to the images I cut out the images with a retired TCP postage themed dies with deckled edges, and then added some postmark stamping with another retired TCP postage themed polymer stamp. Postage style cards are certainly on-trend right now!
I placed all the images on some brand new digi-paper from TCP called Spring is Here! I printed it on some textured white cardstock and it really grabbed the printer ink nicely! Then a layer of vellum anchors the postage with a few die cut hearts as accents.
Cuties! I’ve been hearing the Robins lately in my neighbourhood and it gives me great delight! Enjoy your day, thank you for stopping by!
Tuesday, April 16, 2024
Two Techniques with Crafty Meraki!
First up, I created a design that showcases foiling, ink blending, and a faux spotlight technique with a lovely result.
I began by ink blending the background of white paper with Distress Oxide Inks in blues to raspberry shades in an ombre feel. I heat set the paper and then foiled the beautiful


Crafty Meraki Elegance Hot Foil Plate onto it with my Glimmer Machine in silver. I foiled the image a second time on Copic XPress it Blending paper, and used that for Copic colouring part of the image.

When my colouring was completed, I trimmed out the part of the image that I wanted to use as a type of “spotlight” of the design, where just part of the image is coloured, and attached it with foam dots.

I also foiled the sentiment from Handmade Love. I die cut a sparkly silver frame to add attention to the Copic coloured part of the design, which also serves to anchor that part of the card, and finally added some silver enamel dots for more shimmer and shine.
My second card showcases embossing and watercoloring!

I have loved watercolouring for so many years, so it was high time I pulled it out again! I began by heat embossing the lovely arrangement from the stamp set Reason to Smile onto watercolour paper with Embossing ink and a heat tool. The raised silver embossing creates a “border” for the watercolouring to sit in which makes painting the small sections a quick process. I used Daniel Smith watercolours for their beautiful vibrancy.

I painted in a very soft wash of background, some paint splatter and then white acrylic paint splatter to bring some texture.

The embossed sentiment is included in the set and I added it onto a coordinating colour of cardstock, trimmed it out and popped it up on the design with foam dots, and a few enamel dots to match. That soft creamy white is such a lovely backdrop for the vibrant flowers!
Thanks for joining me today!
Sunday, April 14, 2024
Monday Sunshine with Concord & 9th
Hello! How about some sunshine to get ready for Monday morning?! I have a cutie here from Concord & 9th with their newest Turnabout Stamp called Folkart Flower. These stamps are a nice way to create your own layers of colour in a patterned paper style of print with up to 4 colours of ink, or you can stamp with less colours, even monochrome. And this one is extra fun because you can choose to remove the center of the stamp to make space for a focal image. I picked a fun colour combo I liked that sang Spring to me.
I’ve paired the background stamping with some pretty die cute flowers from the Build a Bloom Dies to coordinate with the stamping. This card is a 5 x 5 size.
The sentiment is from the Turnabout Stamp, and I’ve added some extra enamel dots and leftover paper pieces to accent the middle like confetti.
Thank you for dropping by!
Subscribe to:
Posts (Atom)


