
Do you need a lot of wire rings that are consistent in size, but you don’t have an expensive pendant drill and jump ring cutting system? Read on for the simplest and least expensive ways I have found to achieve a big pile of uniform jump rings.

Stuff you’ll need…
You’ll need to gather some tools and such… Pictured above from left to right are:
- Jeweler’s saw with 2/0 saw blade
- Truss clip (we’ll go over this further down)
- C-clamp
- Winding jig (we’ll go over that in a minute, too)
- Copper wire
- Transfer punch set (top of photo)
- Side cutters (bottom of photo)
WINDING COILS
To make wire rings the first thing you need to make is a wire coil, and the really crucial part of making a coil is having a rod shaped object to wind the wire around. You can use knitting needles, metal rods, and even wood dowels as mandrels to wind your wire coil on. What I like best, though, are transfer punches. The thing about transfer punches is that they come in a set, and thus are a really inexpensive way to lay your hands on a nice selection of mandrel sizes. Plus they generally come in an “indexed stand”, which means the sizes of the punches are conveniently marked next to the appropriate hole in the stand.

Transfer Punches: 3/32″ to 1/2″ by 64ths increments.
Harbor Freight carries just such a set of 28 punches for a mere $9.99 USD.
There are metric transfer punch sets available too. I found mine at MSC Direct. A set that goes from 1mm to 13mm includes the most appropriate sizes for chain making.
The other thing you need is a way to smoothly wind the wire onto the mandrel. You can, of course, do this by holding the mandrel in one hand and the wire in the other, but the resulting coil will be much smoother and more regular if you use some kind of mechanism as a winder. Hands down the simplest and most inexpensive winder is one made with a bit of hardwood and a small nail.

Simplest winder EVAH!
To make a winder like this you’ll need a piece of hardwood, like oak. The one in the picture is about 3/8″ thick (~1cm), and just over 1.5″ wide (just under 4cm). It’s a little more than 4″ long (about 11cm). The wood can also be thicker and wider, so forage about and see what you can dredge up. The local lumber yard may have a scrap bin that would supply you with admirable options at very reasonable prices.
You’ll also need a small nail with a small head on it.
Drill a hole in your piece of wood that is exactly the size of your mandrel (1/4″ in the picture). If you don’t have a drill bit that is exactly the size of your mandrel, drill a slightly smaller hole and enlarge it to the right size with a file.
Pound your little nail into the wood just to one side of the hole. You want it close to the hole, but not so close that it splits the wood and pulls out.
To use the winder, bend a “J” shaped hook into the end of your wire and hook it around the nail. Insert the mandrel into the hole so that the majority of the rod protrudes on the side with the nail and the wire.

Setting up for winding a wire coil.
By the way, I am left-handed, so my nail is on the right side of the hole. If you are right-handed, your nail should be on the left side of the hole. This will allow you to most easily monitor the wire as it winds onto the mandrel.

Finger position for starting to wind.
Position the index finger of your dominant hand behind the mandrel, with your thumb on top of the wire. Your non-dominant hand will hold the wooden winder and begin to rotate it, pulling it first towards you, so that the wire wraps over the top of the mandrel, making it easier to see the wraps as they are formed and keep them tight and even.

Winder coming around.
In the picture above, the winder is at the half way point, and will now be pulled down towards the table, then back towards you. Keep your thumb firmly on the wire, and push it towards the wood as you go around. The goal is to have no gaps between loops of the coil.
A nice even coil.
Once you have a coil about 3″ (7cm) long, you may notice that the strain is beginning to bend your nail a bit. Prudence dictates that you stop, cut off the coil, and wind another coil if you need more rings.
CUTTING RINGS
Now that you have your coils it’s time to cut them apart into rings. This cutting task, it turns out, is a surprisingly difficult one for novice jewelers to tackle with a standard jeweler’s saw. When I teach classes in chain making, I always show students how to cut rings with a jeweler’s saw, and over the years, I have found that the key to success is having a sturdy support for the wire coil, which otherwise tends to roll and wobble, while individual rings try to spring away from the end of the coil and the whole business generally misbehaves.
My solution is a small piece of hardware that costs less than one US dollar. The part in question is called a truss clip. It’s about 3″ long and is designed for attaching roof trusses, or parts of decks to other parts of the roof or deck. At least that’s what I have gleaned from the pictures on the box and the aisle at the lumber yard where they are found.

Behold! The mighty Truss Clip!

Truss Clip shelf tag at Home Depot, Seattle, WA, USA.
Before you can use the truss clip for cutting rings, though, you’ll need to alter its shape just a bit.
Put the truss clip in a bench vise, with the right angle bend in the clip touching the flat top of the vise.

Truss clip in vise.
Grab onto the part of the clip sticking out of the vise (I used vise grip locking pliers) and open up the bend in the clip, taking care to keep the part you are gripping flat and even.

Bend truss clip evenly.
Your goal is to open the bend from the original 90 degrees to about 130 degrees.

130 degrees.
You’ll use a C-clamp to attach your altered truss clip to a bench or table. The Clamp needs to be on the right side of the clip because the nuts on a regular jeweler’s saw are on the left side of the frame, so this arrangement will keep the saw from hanging up on the clamp.

Locate clamp on the right side of the truss clip.
Rest your wire coil in the left hand groove of the truss clip, and use masking tape to secure it in place. Pull the masking tape tight across the coil from one side of the truss clip to the other, as if you were pulling the bed sheets tight across a squirming child and tucking them firmly in under the mattress. If you try to conform the tape around the coil and down onto the truss clip, you’ll end up with too much play in the tape and your coil will wiggle about. Tape down the whole length of the coil.
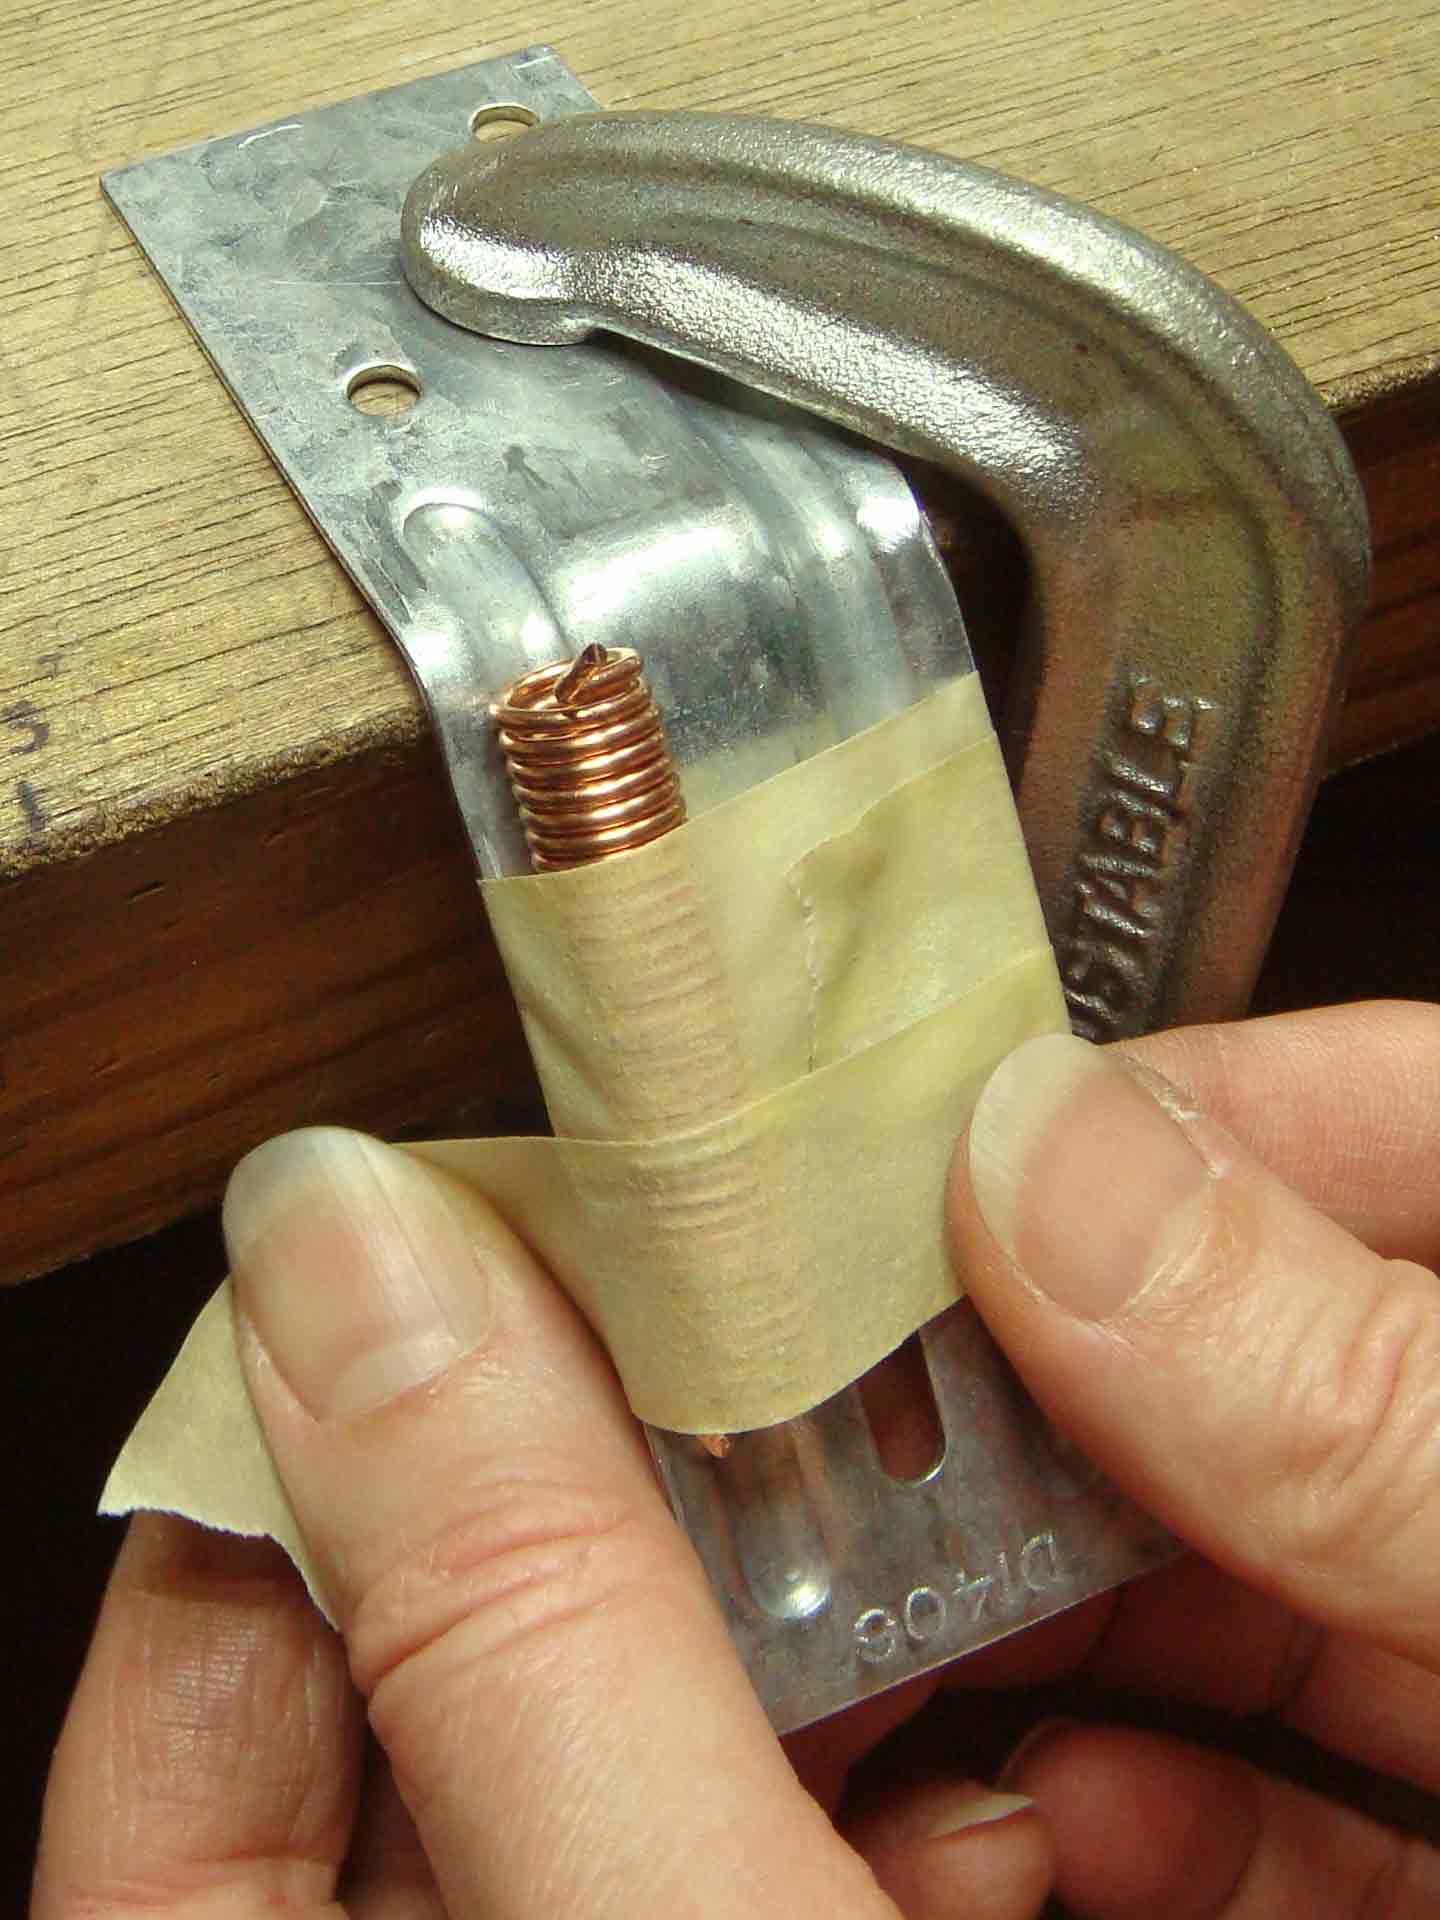
Tape is tight across the coil.
I like to position the cut end of the wire at the top of the coil so that it is facing out towards me, since then I can use it as a guide to run my saw blade along to start cutting my rings. Hold the top ring of the coil down with your thumbnail to keep it from being dragged up and away from the coil by the action of the saw blade’s return stroke. Angle the saw so that the blade is touching at most 3 rings.

Top ring is held by thumbnail.
Cut down as far as you can on the coil. If rings end up caught on your saw blade, hold the blade horizontally with the teeth pointed down at the bench and gently rotate the rings until the slits are facing up. The rings will fall off, and you won’t run the risk of cutting your finger on the blade.


When the saw blade begins to hit the truss clip, stop and move the remaining portion of the coil up to the top of the clip. Re-tape it and continue cutting.

Re-position coil and continue cutting.
It’s difficult to cut the last couple of rings on the coil, so I usually put those in a ring clamp to cut them.

A ring clamp helps get the last of the juice (rings) out of the coil!
Have you been yearning to try a new chain pattern, but dreading the hassle of cutting the rings? My fervent hope is that the information outlined here will cut down the hassle factor to a manageable size and get you straight on to the deliciously addictive candy of chain making!
xo,

P.S. Did a friend forward this post to you? Did you stumble on it by accident? Want to eliminate the element of chance? Click here to get on my direct list.

Nice. I learned this in school but you add some sweet bells n’ whistles.
Very cool and thank you for all the locations to buy the supplies. Thank you very much for sharing.
You’re most welcome! I’m always a little leery of including supply links since I have readers from all over the world, and I don’t want anyone to feel left out. In this case, though, I thought it would help to start folks off on their sleuthing searches ;).
Brilliant. I hate cutting the rings.
Thank you Julia, was very usefull to me ! I cut my fingers many times !
You’re welcome! I hope your fingers stay safe from now on :).
I like the idea of using the punch set. I use knitting needles with the ends cut off and a drill. They coil up fast. Funny thing is I saw that set just just last weekend and never thought of using it this. Thank You 🙂
I have seen other tutorials explaining how to do jump rings, but your’s is the best!!!!!!!
Thanks for the tutorial!! 🙂
Thanks, Charlene! Glad I could help :).
I have a jump ringer, but this a great tut. For when I’m lazy an d don’t want to get it out. Thank you!
Thanks. Glad you like it!
Have you thought of putting your transfer punches in a drill to wind them up? That’s what I do. The drill can’t do every transfer punch size, but it can do a lot of them!
I have done this, yes. I prefer a hand winder, as it gives me more control for winding wire coils, but if a drill is your only option it is absolutely VITAL that the drill MUST be variable speed, so that you can run it VERY slowly! Running it fast with wire in your other hand is a recipe for disaster. I don’t know if you could actually cut off a finger, but you could certainly hurt yourself pretty badly :(.
Hola Mariela! No he intentado traducir mis artículos a español, pero talvez es hora ensayar el experimento :). Viví para muchos años en Costa Rica, pues, me defiendo conversando en español, aunque no se si mi vocabulario es adecuado para poder ofrecer las explicaciones mas técnicas que la práctica de orfebrería requerirían. A lo menos, puedo ofrecerte mi mejor esfuerzo en cuanto respuestas, si me quieres preguntar algo :).
Thanks for this helpful, inexpensive suggestion. I tried it with great success! Please note it is crucial that the saw blade be taut. I like to use laser gold saw blades #110304 size 4/0 from Rio Grande. They produce a nice sharp cut that makes it easy to tightly close the jump rings (or to solder them closed)
Do you have suggestions on cutting oval jump rings?
I was taught to wind oval jump rings around a flattened piece of heavy gauge copper wire. Before winding the rings around the flattened mandrel, wrap the mandrel with a piece of paper. Once the rings are wound, you won’t be able to get them off the mandrel UNTIL you heat them up and burn away the paper between the oval coil and the mandrel. Once the paper is burned up, you can rinse away the ash and remove the oval coil from the mandrel. If you want to, you can cut the oval rings while they are still ON the flattened mandrel. I think that would make the cutting easier.
As a very novice jeweller with 1 cut already in her finger from my very first class, I am going to follow your instructions to the letter. I am from Australia and I am so grateful for the web that allows us to access wonderful instructions from people like yourself, so thank you.
I really love this idea of cutting the jump rings like this. Much easier than cutting them one by one with a flush cutter. You get them all done in the same time that it might take to cut maybe two or three with the flush cutters. Thank you for sharing.
God Bless,
Cat
The other problem with cutting rings with a flush cutter is that it is pretty much impossible to get all the rings exactly identical in size, which is easy-peasy when you saw them :). So glad you found my post helpful.
This is so clever! I have always found trying to do it on a bench pin really awkward.
Thanks! Glad to help :).
I cannot thank you enough. I knew there had to be something out there to help cut jump rings but I couldn’t wrap my brain around it. I have tried your way several times with sterling and copper wire, 14 gauge through 20 gauge and they have all worked well. Thank You!!
Glad it was helpful, Sheryl! Thanks for sharing your pleasure with your success :).
So glad I found your website. What a great post for cutting jump rings. I do have the Koil Kutter, from years ago, but have found it cumbersome when I don’t need that many rings. Your site is loaded with helpful comments and articles. Thank you so much for all the help with these basic jewelry, getting started, tutorials. We are neighbors in the Pacific NW!
Thanks alot ! Gonna try this right now, seems to be the best method to do it 🙂
(And i’m tired of spending hours looking for my fallen jumprings…)
Love the format. Easy to follow directions with clear illustration. Being a kind of make do and mend type of person I liked your inexpensive use of objects from all areas of D.I.Y. Have used table vice and many kinds of mandrels to work with coils. Hands not so strong now so your home made coil maker is must! Enjoyed this ‘tutorial’. Thank you.
Glad you are finding my posts helpful!
Wonderful tutorial! Thank u very much!
Thank you so much! I just bought the transfer punches at Harbor Freight and the truss clip at Home Depot. Your photo of the truss clip box and Home Depot tag was KEY in finding the darn things on the shelf. Your thorough, clear, very helpful tutorial provides some great tips beyond the class I took a few years ago. Thank you again!
I’m so glad the pictures were helpful! Would love to have you in class again :). Best, Julia