Showing posts sorted by relevance for query rainbow loom. Sort by date Show all posts

Sunday, November 10, 2013

Rainbow Loom Craze


The Rainbow Loom has finally hit our area! I may be a little older than the other enthusiasts for this neat toy, but it reminded me of a something I played with when I was younger, so I had to try it out. I was not disappointed...for the most part. What I found disappointing was that there weren't readily available, easy to follow, non-video directions to be had, especially for the more complex bracelets. Also, I am not a big fan of the c or s clips used to close the bracelets (I have a solution for that though, which I'll share later!)


Now, I like to craft, and when I do, I go crazy making sure that I have as many colors and styles available, but I absolutely hate to pay full price or miss out on paying a cheaper price just because I didn't check another store. Just ask my husband about my craft cupboards, closet full of yarn or my totes of pony beads...or how giddy I get when I find good coupons! Though I'm not against online shopping, I definitely have a "want it now" mentality, so shopping online doesn't work very well for me.


So, checking around my area, Michael's is the only one currently carrying the official Rainbow Loom and they seem to be having a hard time keeping it on the shelves. JoAnn is carrying the Larose rubber band bracelet maker and I saw that Wal-Mart is starting to sell their version online called the Wonder Loom, so that will probably be in stores soon. Once you have the loom, you need the rubber bands which can be pricey if you have an active loomer. JoAnn is doing their best to compete by carrying a larger variety of the rubber bands for a cheaper price ($1.99 for 500 of the regular colors and $2.99 for 500 of the specialty ones, ie., glow-in-the-dark, glitter, tye-dye, striped, etc.) I've been able to find the rubber bands at other stores too, like Books-a-Million ($3.99 for 500) and the Dollar Tree ($1 for 100). By far, the cheapest place I've found them is Sally's Beauty Supply (and Walgreens) which sells them as hair rubber bands, not loom toys, which makes them a steal at $1.79 for 500. Now they have a little different texture, but they are not the cheap plastic ones that have become popular for hair. I found them at Sally's in neon (pink, green, yellow, blue), black and brown. I was pretty excited about the brown too, since it wasn't the norm. 


In the spirit of keeping costs low, I was pretty annoyed that Michael's wasn't accepting any coupons on the Rainbow Loom or the rubber bands, but I could maybe see why since they seemed to help take the toy mainstream when it was only doing so-so at the Learning Express stores. So, I blew that annoyance away, particularly since there is also a JoAnn's in town and I could get the rubber bands cheaper and I could use coupons!...but just 3 days ago, JoAnn established their no coupon use policy on their looms or the rubber bands. Booo to you, JoAnn! At least I had stocked up a bit before this went into effect, saving a little bit of money.


At the beginning of the post, I said a had a better way to close the bracelets and I think I do. I haven't seen any other examples of this on the web, yet. Now, I have seen that people have been adding charms, beads or other things to fancy up the bracelets, but they still have that c/s clip which I think cheapens the whole bracelet. (Can one cheapen a bracelet made of rubber bands?) 


I have found a way to use a button as a closure on just about every bracelet (I haven't tried the hexafish, but I'm sure I could make it work) completely eliminating the c/s clip and making the bracelet seem less like a kid's toy and more like something an adult could wear. And let's face it, you know your kids are making these for you to wear, so why not upgrade it to something you would wear all on your own!


This is the direction for a fish tail bracelet using a button closure:


(1) Using  a crochet hook
(3) Finished
(2) Using string
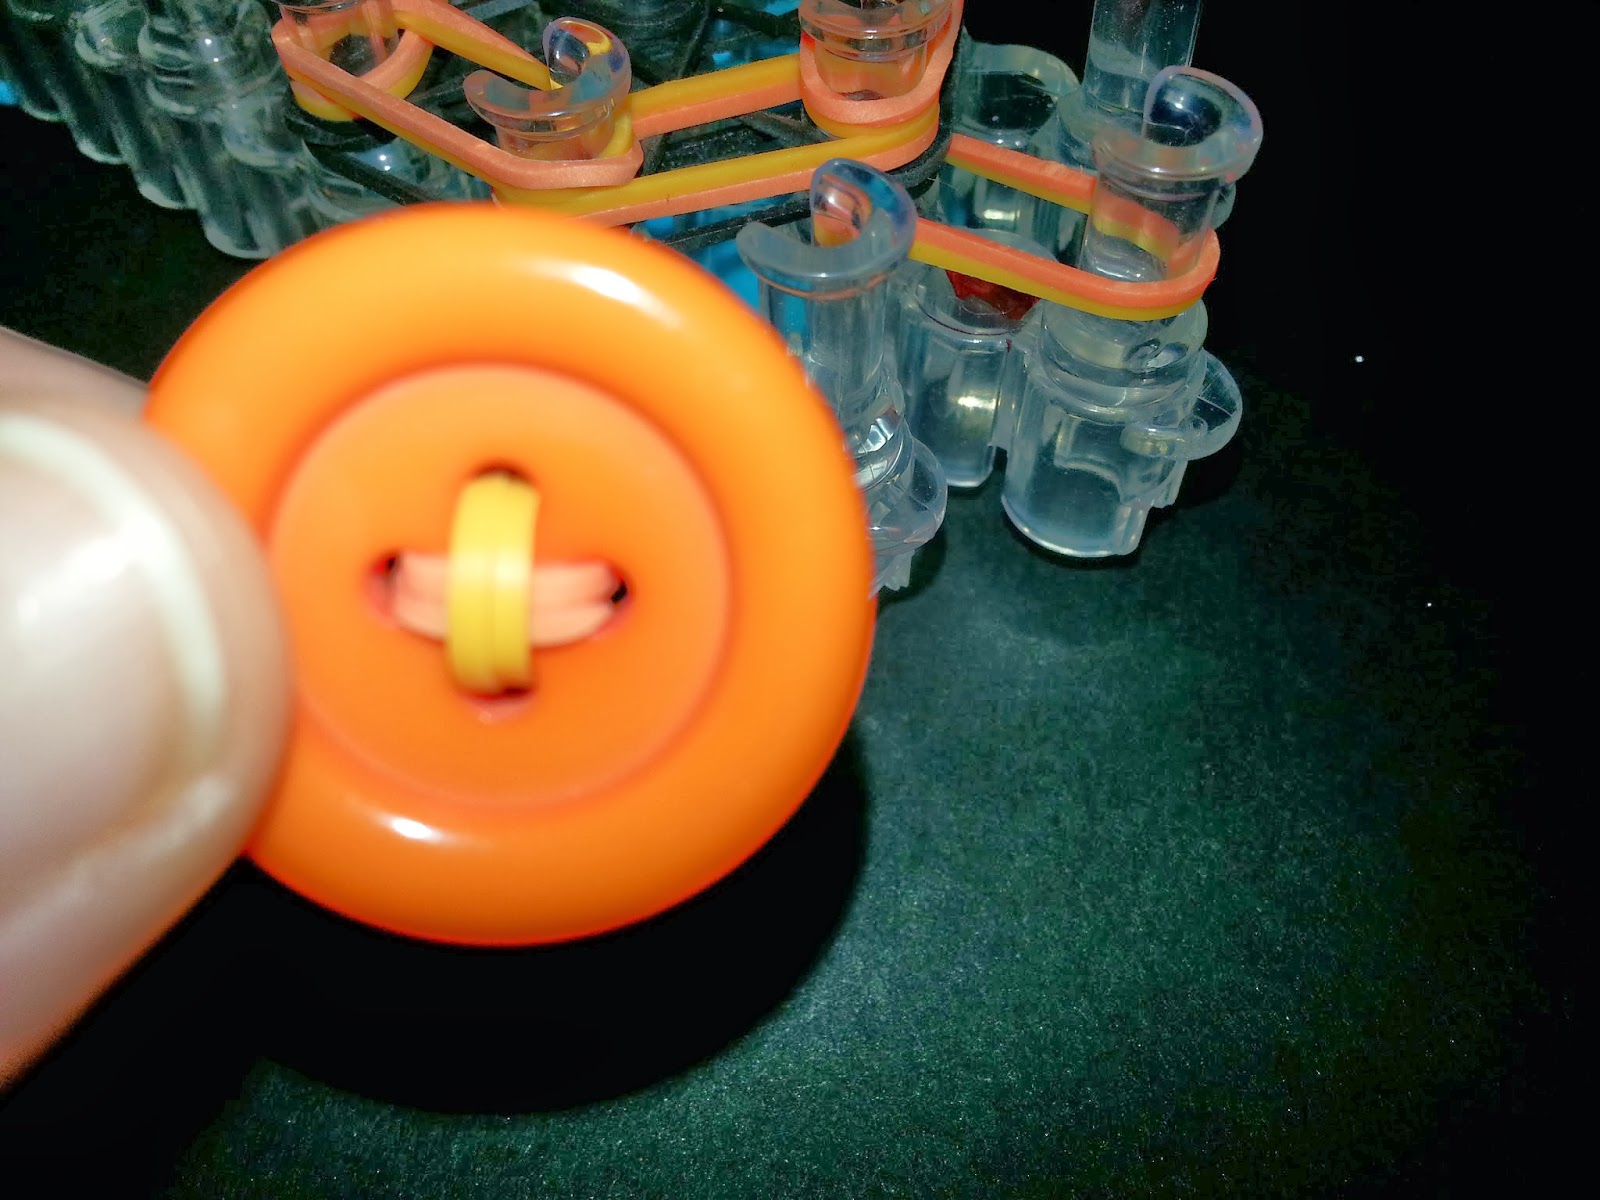
1. You need to find a button you like and decide on your design. This button has a circle shank on the back which makes it easy to thread the rubber band through, which is what you need to do first. If you have a hard time getting the rubber band through, try using a small gauge steel crochet hook to pull the rubber band through (1) or you can loop a piece of string through the rubber band (2) and then thread the string though the shank pulling the rubber band through that way. This button has a large hole so I didn't need to use a hook or string, but with other buttons, it's a lifesaver. Once you are finished, it should look like the picture in (3).


(4) How to place on the loom
First few steps
Complete
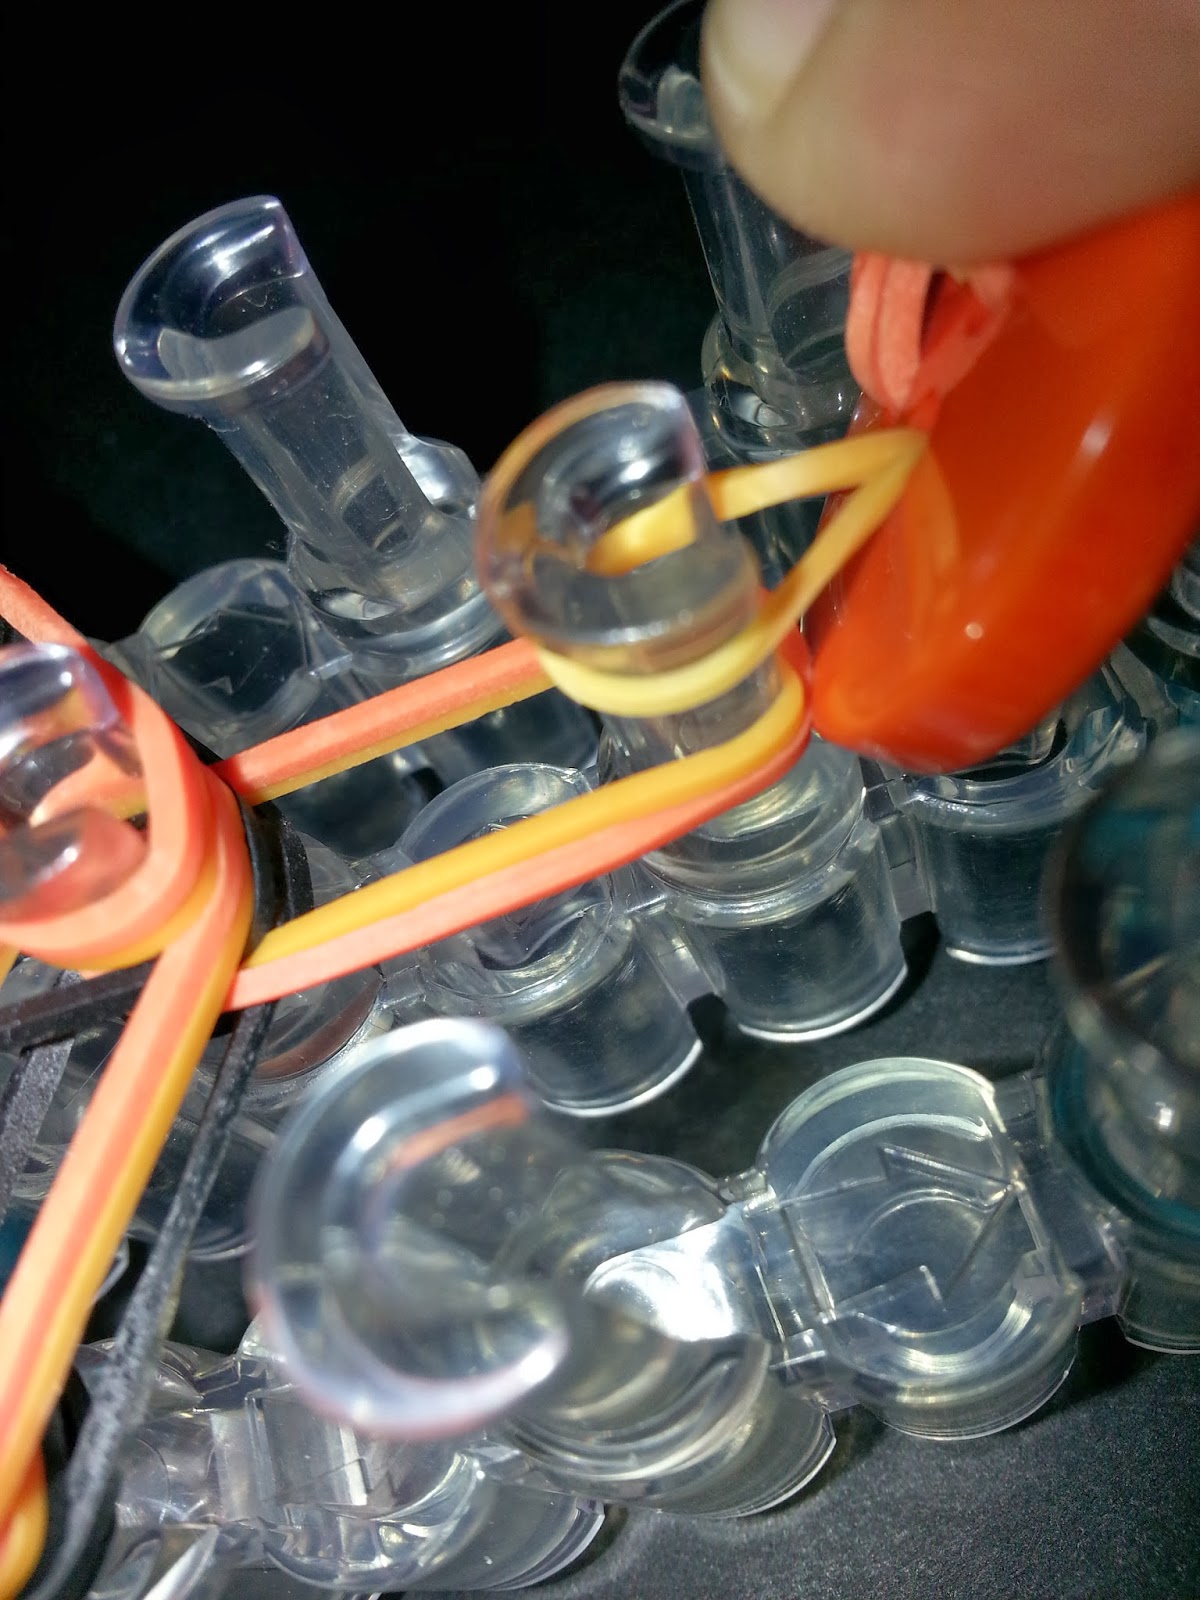
2. Now you need to add the button to the loom (4). On a normal fish tail bracelet, you would take the first rubber band and make a figure 8 with it. Adding the rubber band with button eliminates the need to do that. Now you add your next two rubber bands on top and complete a normal fish tail bracelet.


(5) Wrap the rubber band around the button
3. Now you simply remove the last rubber band from the loom and wrap it around the button like it's shown in (5).


Doesn't this look great? No cheap looking c/s clip! It stays closed and the possibilities are endless with the types of buttons that are available to use. 


That's all I have for now, but I will get another post made using buttons with holes and the different ways to attach them to bracelets. I also have a couple of bracelet ideas I haven't seen used before, so keep coming back to check for more!


Friday, January 31, 2014

ONE Loom Checkerboard Rainbow Loom Bracelet Tutorial


I'm totally stoked! I figured it out! I decided to look at the loom a different way and it has opened up a huge number of possibilities regarding how I can make bracelets. I've really started to get into this taking a part of the loom so that a bracelet that normally couldn't be made on one loom is now possible! It all started with the one loom Kaleidoscope bracelet and has expanded from there...the one loom Stained Glass bracelet too.


Sometimes, though, I feel like I keep revisiting the same bracelets, mainly because I keep thinking of ways to better it or to reduce the number of  looms so that more people can enjoy them....and really, it's the last part. I want everyone to be able to wear all designs that the Rainbow Loom has to offer and if I can figure out how to make a bracelet go from needing two or three or more looms to make...down to just one, I think that is fabulous!

I've got quite a few tutorials that will be coming out in the next week...my Granny Square, the Zipper and an alternate version to the Stained Glass bracelet (that only needs one loom and can be made as long as you want! No extensions to figure out!) So it is going to be pretty exciting around here. I hope you will stop by often to see what is going on!

Without further ado, I am presenting my One Loom Checkerboard bracelet tutorial. I did mess while I was filming and only realized it after I was editing. Hopefully, not too many people will hold it against me!


As always, ENJOY!


Friday, August 8, 2014

The Happy Food Series Continues!

I have been working tirelessly continuing the Happy Food series! Ok, so maybe not tirelessly, there have been way too many nights spent looming into the wee hours of the morning. Thank goodness my hubby is so supportive! 

I'm really proud of all of these. I feel like they are super unique to anything else out there. Even if someone else has made a fruit or vegetable design before, I am still able to take it to the next level, making it unique to me and my looming style. I'm really happy with how they have turned out! It's definitely not without it's work, that's for sure! 

I'm sorry I haven't updated here as often as I should. Between creating designs, filming, editing, rendering, uploading, socializing, answering comments on YouTube AND still making my family number one. I feel like I rarely have time left for anything else. I'm afraid that at some point in the near future I'm going to have to change answering all comments on YouTube to just answering the ones that request help. I get hundreds of comments a day and it takes a few hours to answer them all, which is time that could be spent designing. I don't know, so torn! 

Anyways, it's time to update the roster of Happy Foods! And there are quite a few! :)


We have the Happy Asparagus. It's not a favorite it appears, but I love it!

You can find the tutorial here: 


Next we have the Happy Peas in a Pod. This one DEFINITELY is a favorite!

You can find the tutorial here:


Then we have the Happy Cherries! I so wish I would have thought to make them detachable like I did with the Happy Grapes, but I still love them! :)

You can find the tutorial here:


Then we have the fabulous Happy Strawberry! I love this so much! So adorable and my flower I made for the strawberry was so requested that I put a little tutorial at the end of my Happy Grapes video to make it. :)

You can find the tutorial here:


Now the Happy Grapes! I was stoked to figure out how to make the grapes detachable! This was a very band heavy design and I wanted to give kids the option to reduce the amount of bands needed. I figured detachable grapes was the perfect solution! Make as many as you want, then just pretend the others were eaten. Great idea I hope! 

You can find the tutorial here:


Then we have the Happy Pear! I love how it turned out. I did my best to try to make a nice fat bottom with a tapered neck on it. This design is a bit more complicated since it's a looming down design, but it's still workable for all looms. 

You can find the tutorial here:


And of course! The Happy Apple had to come along too! I am super proud of the shape. It took quite a bit of playing around to get to the finished result. I hope you like it too! 

You can find the tutorial here:


Then we have the Happy Pineapple! OMG! I love how it turned out! I think my suggestion to use mango bands from Rainbow Loom helped to sell them out! Cool! But I want more bands! I love the wrapped bands on it. A pain to make, sure, but SO worth it! 

You can find the tutorial here:


The Happy Watermelon had to come along too! I love how the shape turned out! It took me awhile to get the even triangle shape; the first few times it looked more like a piece of pizza, lol. I made it as a growing up design, but then I turned it inside out. Just seems to work better and makes it so anyone can make it regardless of whether or not they had a Rainbow Loom. 

You can find the tutorial here:


The Happy Banana! Oh my! This took forever to perfect, lol. I wanted it to look just right. I tried making several different versions and sizes. Tried doing a removable peel which I loved the peel, just not how they looked together when the banana was inside of it. I love how it turned out though. The construction of the banana with the peels did require me to remove the pin bar in the middle of the loom, which kind of was disappointing since I want my designs to be available to everyone regardless of the loom they have. I first had made it with cheap bands and it worked fine without removing the pin bar, but once I used good bands I could barely keep it on the loom or keep the loom from falling apart. I still love it though! :)

You can find the tutorial here:


And another highly asked for fruit, the Happy Mango! It took awhile to get the shape just right. The fat top, the curve and the little bottom, not so easy, lol. I have heard comments since that I made the little bump on the bottom too big, but I think it looks perfect; too much smaller and I don't think it would have been as obvious what it was. And contrary to what people might think, this is not my Happy Pear upside down, lol. I used mango bands to make it and of course the Rainbow Loom online store has been out of stock, lol. I'm hoping that they get more back in stock soon and that they will be the same color when they do. I had heard that they were a production error on the neon orange bands (hence why there were stickers that said mango on the back covering the neon orange name. Hopefully, they will come back soon; I actually like the color quite a bit. 

You can find the tutorial here:


So that's everything up until now! Whew! I'm still working on many things. Just time to make them is the barrier I face. But I'm doing my best! 

Thank you for stopping by and I hope that you enjoy your Happy Foods! :)


Wednesday, June 18, 2014

Radical Rainbow Tutorial using only a hook!


I'm always trying to think outside the box when it comes to the Rainbow Loom. In order to keep it new and exciting I think that using the loom in different ways, looping the bands out of the normal ways and just not using the loom at all. Like with this tutorial. I was really excited to be able to put my crochet skills to use and make this awesome rainbow with only my hook! No loom required! I think it turned out pretty adorable! I hope that you do too. Don't be afraid to try it! Once you get the first two rows down, you shouldn't have any problems with the rest of  it! 

You can find the tutorial here: 


Enjoy! 

Saturday, February 1, 2014

Zipper Rainbow Loom Bracelet Tutorial


I actually came up with this bracelet on accident. I was trying to figure out another bracelet and how I could manipulate it to work on less looms, but I think it worked out after all. I am kind of nervous that this bracelet has been done before because it really is soo simple in design but that I just haven't seen it yet. I know that for as long as I have been looking on Facebook, Google, Instagram, YouTube and so on, I haven't seen this bracelet that I recall. So, I am keeping it and calling it the Zipper, because it looks like the middle is zipped up. 


And what really makes me excited is that this bracelet is done on only one loom AND it is stretchy enough to go all the way around your wrist without an extension!!! Of course, though, I had a nice fail while making this video. I wanted to show what it would be like to add beads in a different way so you can't see the openings, I sure did that, but I managed to change the entire look of the bracelet so it wasn't even recognizable. But, I couldn't just throw the video out because I said I would show everyone how to add the beads the different way and maybe in my fail, it won't happen to anyone else. That is my fail below, but I still really liked it, so I'm calling it the Vine, lol. 


Without further ado, my tutorial for the Zipper Rainbow Loom bracelet!


As always, ENJOY!!


Thursday, January 30, 2014

Multiple Button Closure for Rainbow Loom Bracelets

I really like the look that buttons add to the Rainbow Loom bracelets. And besides, it's not just that, but they are functional as well. I don't have to mess with the ugly, not always secure c/s-clips that come with the loom. You can find some adorable buttons to add, dinosaurs, hearts, robots, flowers...anything. I even see buttons on several bracelets being called charms (please don't buy these "charms" at jacked up prices when they are just buttons you can find at Wal-Mart, Michael's, JoAnn's, Hobby Lobby, Hancock Fabrics, etc)

And they are soooo easy to add! Any place you can place an end cap (doubled rubber band on one peg) you can place what I'm calling a button cap. You simply pull a rubber band through the button holes and then take the ends and wrap them around the peg. It doesn't matter if you button has a shank (loop that sticks out from the back of the button) or regular buttons like those below that you can put the bands through. You can take a look at this post to get a better idea of what I mean. I plan to do a video tutorial explaining a lot of this, but for now, a blog will have to do.


Quadruple Double X bracelet with 4 buttons

Bracelet with 2 buttons

See how the button caps are looped around the pegs? This is done in place of the end caps that you would normally put on the bracelet to secure the the bands when you are first looping. (So, the opposite end from the red arrow.)

After looping the entire bracelet, you take any open ends and wrap them around the button to secure it. Cute and functional!

Tuesday, January 7, 2014

I Haven't Been Idle...

So, things are starting to get back to normal around here. The kids are back in school...well, kinda, they have had cold weather closures the last two days. We've just been trying to keep warm!


I haven't had time to get any tutorials together, but I have come up with several new designs, tutorials will come as soon as I can get them together. But until the tutorials come, I thought that I would show case some of them for you. Let me know what you think!


First, these are my attempts at a Diagonal Granny Square bracelet. I'm still trying to figure out how to get it to have a more square appearance. It did take 9 pin bars to make this bracelet. It could be made on less, just that these particular ones are on 9. 


Next, we have a Large Granny Square bracelet. I think it looks pretty fabulous...and I can just go crazy with all the possible color combinations! This was made on 6 pin bars wide. You can get 3 of the squares on 1 loom length.


Next, I have a bracelet I'm calling Fishnet because it reminds me of fishnet stockings. I really like this design, especially the little picots (small loop...crochet or embroidery term) that poke off the sides of the bracelet. They would be great for attaching charms to if you liked to do that. These bracelets were made on one loom length long and 5 pin bars wide. You would need 2 looms long to have it go all the way around your wrist.


1/8- Saw a very similar looking bracelet on Facebook, but again it is a different design overall.


So, in this sample, I was just throwing around some ideas on how to make another granny square like bracelet. Each square is actually a different pattern of band looping. Mostly it is the center of the square that is different. This bracelet was made on 4 pin bars wide and 2 looms long. You can get 4 squares on one loom length. Keep reading to see a bit more of each bracelet!


I think that this bracelet is beautiful! This is the perfect Granny Square bracelet. There is so much potential for color combinations!


I am calling this bracelet the Buttonhole. It is surprisingly simple to make. It's also perfect for me because I can actually use it with my buttons as you will see in the next picture. 


*Logging onto the Rainbow Loom Facebook page, I saw that a design called the Open Oval is now available. It looks similar to my design, but it is not the same. 


I'm not totally loving the color combo I used on this bracelet, but I like the idea of it immensely! This bracelet has a lot going on! On one end I have attached a button to the middle of the square. The squares along the middle have a bead that the center rubber bands are looped through. And finally the far end of the bracelet has a square from my Buttonhole bracelet.....Combine all that together and you can close this bracelet!


I love these beads! And this bracelet! It's kind of like my own little flower garden. I believe these beads were purchased from Hobby Lobby, but I swear I have seen similar ones at Michael's... or Jo-Ann's too. This bracelet just involves adding the bead to the center of my Granny Square bracelet.


I think this bracelet is adorable! It's the same Granny Square bracelet, only with a button added to the center. The colors give me the feeling of pop art.


So, this bracelet is still a work in progress. I am planning to call it Vortex. It is made on 3 pin bars wide. I'm just having a little trouble getting the bands to go where I want them to. I'm not sure if it will be important to place the colors of bands in a specific place in order to see the pattern or if I'm just missing something. I'm still working on it!


This bracelet is basically the same design as the one above, but I have removed the center divider bands...kind of. I'm still playing with it, but it is neat as it is actually bumpy. Maybe if I change the colors it will work a little better to see the design. (At least in my mind)


This is my Checkerboard bracelet. I absolutely love it! It's unique and different and just fun to look at! I did make one that had a dark border but I wasn't sure I liked it as much, but it was late, so I may not have been thinking straight!


And this bracelet I think is awesome, and surprisingly easy to make. I'm calling this my Elongated Checkerboard bracelet. It just looks fun! It's made on 5 pin bars wide and best made on 2 looms long. 


So what do you think? Hopefully you like my designs as much as I do! I'm working as best as I can to share my ideas! I've had a few critiques suggested for how to do my videos... some not so nice :(  ......but I'm going to do my best to make improvements. I just hope that everyone understands that I am not a professional and I am sharing my ideas because I love to create! And share! 

Anyways, don't give up on me yet. My kids are always the top priority and so my creativity takes a backseat when they need me...which is all the time it seems, lol.


Wednesday, November 13, 2013

Kaleidoscope Bracelet Tutorial

I posted pictures of my bracelets on the Rainbow Loom fan page on Facebook. I was really pleased to see the response they received. Thank you so much!!!


I finally got it done! 


Here is my video tutorial on how to make my Kaleidoscope Rainbow Loom Bracelet.


Enjoy!!


I haven't made videos for a long time, so I hope that everything is clear. If it isn't, please let me know so that I can fix it or if you have questions about how I did something, let me know that too!!!


Wednesday, June 18, 2014

Playground Slide Tutorial for the Rainbow Loom

While playing with my kids at the park, I kept looking at all the playground equipment and thought to myself, you can totally make that in rubber bands, lol. You know you've gone over the edge with Rainbow Loom when you do that, lol. Just a little obsessed, lol. So after a lot of trial and error to get it to look the way that I liked, I finally found a great version of the slide I enjoyed! I do plan to do more with playground equipment, just gets a little hard with trying to not have to include a bunch of other random things to support the structures. I'll get it though! :)

You can find the tutorial here:


Enjoy! :)


Sunday, March 16, 2014

Metal Hook Anyone?


I keep on breaking my plastic Rainbow Loom hooks. I've gone through 6 in the last 4 months or so... I had hoped to wait it out and get the metal hook from Rainbow Loom, but they kept on pushing the release date out. Now, I've been using crochet hooks, but I found that the one that I really liked (inline), that had a deep hook is cutting my bands if I pull it through too many and the other hook (tapered) doesn't have enough hook to hang on to the bands. So I got this brilliant idea the other day. I turned a latch hook into a pretty reasonable substitution. A latch hook is used for fixing carpets or making the pillows/rugs that come in the little kit boxes.


This is a Caron bent latch hook with wood handle. I picked it up from my local Jo-Ann's craft store. It was $3.99. It was the only style they had, but apparently there are straight versions which would have saved me a bit of hammering, lol.


The middle piece simply unscrews from the base. It's in there pretty good too, but I needed to remove it so that I could straighten the hook. I held the metal with a pair of pliers (wrap your pliers with tape or something if you don't want to scratch the hook all up) and just kept twisting until it came out.


Now the fun part! I simply held it down on the floor (carpeted) and used a hammer to get the bends out of it. I had tried to use the hook without hammering it, but it was way too awkward. Once I had it as straight as I was going to get it, I screwed it back into the base of the handle as tight as I could get it. Then I took pliers and twisted off the latch part. I couldn't get it all the way out, but it broke off close enough to the shaft that I don't even notice it. I also ended up bending the hook backwards because I found that as I loomed, the bands were sliding to far up the shaft and it made it hard to get them off. It seems to work a little better, but it could just be how I hold it too. To bend the hook back, I just grabbed the shaft right next to the hook with the pliers and bent it back. For metal, it wasn't too hard, lol.


And this is the difference in the hooks, before and after. So far, I'm really liking it. and it was CHEAP...cheaper than I imagine the official hooks will be. Give it a try if you're looking for a new hook!


Tuesday, February 4, 2014

Granny Square Rainbow Loom Bracelet Tutorial

I thought it was about time to release another tutorial! And it is one of my favorites, the Granny Square! I love this bracelet! Maybe because of my love of crochet, which is behind much of the inspiration I have for the bracelets I design, is why it is one of my favorites.


It's done on 4 pin bars wide and in the tutorial I show you how to make it one loom length. Now you will most likely want to extend it so I would suggest watching my tutorial for how to extend the Checkerboard bracelet to get an idea of how to do so, it's the same basic principal of getting it back on the loom, un-looping some of the bands and just putting it back together.


I'm working on several different tutorials at the moment and I hope that you will be pleased once I finish them. I even decided to make a little charm that I think is absolutely adorable!


So, I hope you enjoy this bracelet as much as I do. In the future I will show how to add the beads and such to the middle. For now, ENJOY this my tutorial for the Granny Square bracelet!


Let me know if you have any questions!!

Monday, May 12, 2014

So Infuriating! Boycott this book!


Ladies and Gentleman, I have a request to make. This book pictured was published by Leisure Arts recently. I am asking you to BOYCOTT this book. Why, you ask? Looking at just the cover alone, it says that it contains "17 All NEW Designs"...which is a far cry from the truth. 

This book contains several designs by designers that we look up to and admire for inspiring us to loom on...and one of my designs as well. On the cover alone, you can see the Beaded Starburst ring designed by Made by Mommy. You can see the turtle, shark and basic action figure (though they made it a girl) all designed by Pgloomacy. You can see the double starburst with the braid up the middle which was originally put together by Larry Roberts who dubbed it the "hardest rainbow loom bracelet." On the inside you can see my Herringbone bracelet renamed the Chevron (a name I didn't choose because it was already taken.) 

I have yet to lay my hands on the book itself, so who knows what else is in there. What I do know is that several of the designs that were put in the book were not *NEW* as they were the result of hard work and creativity from other people. Leisure Arts has found a way to take advantage of the "little people" and profit from their designs without so much as a footnote in their book or compensation for the tens of thousands of dollars they stand to make. 

Leisure Arts has done this before, in another book published by them, they used justinstoys Hexafish bracelet with no credit to him whatsoever. They may have found a legal loophole, but ethically they are neck deep! When a person familiar with all the designs can't tell the difference when looking at it...you know you shouldn't call it new or original... Let this company know that they cannot take from the "little people" and get away with it! If you believe in what I'm saying, look out for future posts from me regarding this book and Leisure Arts. Thank you for reading!


Monday, January 27, 2014

TWO loom "Long Checkerboard" Tutorial.

I'm continually trying to make my designs on less looms, that way more and more people can enjoy them. In this tutorial I have reduced the number of looms needed to make it from 4 to 2...and I may even be able to make it on just one, but that is a work in progress!


The other day it's like I had this epiphany regarding how to use the Rainbow Loom. Before I was always thinking of it in one way, but now, well, I'm thinking of it in a way that will enable me to make so many more of my designs on less looms and extending them will be sooooo much easier. You'll just have to wait to see what I mean!


And that 'waiting' word...hopefully the wait won't be too long, but with school closings for the cold weather, I'm losing out on some "me" time to record, edit, etc. tutorials. It's really hard to have all these ideas rolling around in my head of how to do this or that, and knowing that I won't be able to sit down to work them out until after all the kiddos have gone to bed for the night.


But enough of that! I present to you my Long Checkerboard bracelet on 2 looms. In this tutorial I tried to explain how you would extend it beyond 2 looms long, hopefully it wasn't too confusing!


As always, enjoy, and let me know if you have any questions!

Monday, November 11, 2013

Rainbow Loom bracelet with button closure


Doesn't this bracelet look fantastic? Firstly, I love this pattern from the Made by Mommy blog called the Daisy Chain. This pattern can be found here. I change it a little bit when I make it though; I double the rubber band that goes between the daisy chains simply for personal preference and the other thing I do, of course, is add a button for the closure.


In my previous post I showed how to add a button to close the fish tail bracelet and now I'll show you how I use buttons to close other bracelets. 


1. In the picture to the left I have already placed all the rubber bands for the bracelet. Now I need to add the button. This button has 4 holes, so I'm going to use 2 rubber bands to attach it to the bracelet.


2. Here I'm using a steel crochet hook to pull the rubber band through since it's the holes are too small to push the rubber band through.


3. I like to cross the rubber bands when I pull them through, but you can just go up and down too or just use only one rubber band instead of 2. It's whatever you prefer.


(1) 
(2) 
4. On the end of the bracelet that you would start looping (opposite end from red arrow) you will attach the button to the loom. Images 1-3 show how I added mine. Once that is done, you can loop the rubber bands like normal and then pull the finished end over the button to close it. 

(3)


Another view


Any bracelet that you want to add a button to can be done by adding a "button cap" to the beginning of it. You can use one or multiple buttons. I will show you how to do that in another post. I hope this helped and that you love it as much as I do! And I haven't forgotten about sharing my new bracelets with you, they're coming!