Donuts (not the kind you eat) are fun, instant, jewelry components that look great as a focal or all by themselves on a cord. Here’s a way to create a bail for any type of donut whether it’s made of gemstone, ceramic, polymer clay, metal or other material.
Supplies
A donut of any size or material
18ga or 20ga, soft round wire of any type, approximately 7-8 inches for the frame (depends on the size of your donut).
24ga, soft round wire of any type, approximately 20-24 inches for weaving
Round nose pliers
Square or chain nose pliers – optional for bending and gripping wire
Looping pliers or mandrel – optional for creating a loop or bend
Wire cutters
Needle file – optional
Steps
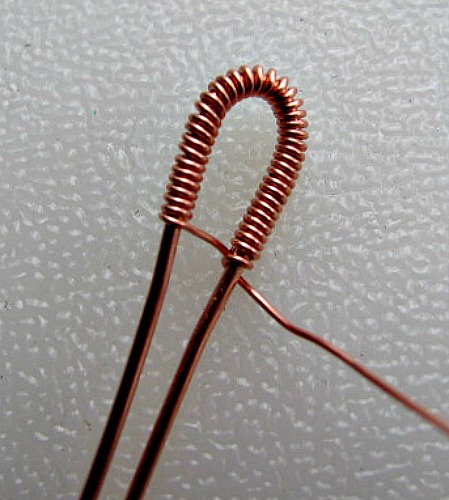
Find the center of your “frame wire”, bend it and create an open loop with a mandrel or other cylindrical object.
Attach the weaving wire to one side of the frame about 1/2″ from the top, center of the of the loop. Wind it around one leg leaving a short piece (about 1/2″) to hold onto this wire.
Continue wrapping the weaving wire around the loop of the frame until you’ve wrapped about 1/2″ on each side of the frame. Do not cut this piece of weaving wire. Cut the short tail of weaving wire at the side where you began from inside the frame. Tuck it in close with your chain or flat nose pliers.
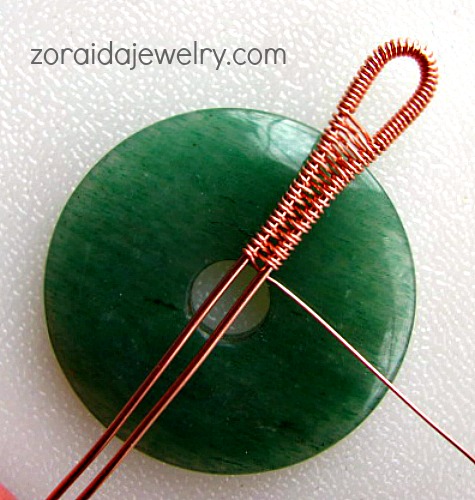
Turn the frame to whichever side you’re comfortable with – I am right handed and find it easier to work on the left leg of the wire first. You will be weaving from inside the frame to the outside, around the wire, wrapping it around twice, up between the two wire legs, over the other wire, wrapping it twice, under and in between the wires again, up and over again to the other side, etc. This is like a figure eight pattern. Try to keep the tension of your weaving wire consistent and your frame wires straight. Check your weaving now and then and close up any gaps by pushing the woven wires closer together with your fingers.
Place the whole woven frame against the donut to check where the hole (in the donut) begins.
Wrap the weaving wire once more around the nearest “leg” and cut off the weaving wire on the inside, tuck it in close. Create a bend in the frame wires just below the woven section with your round nose pliers.
Insert both of the ends of the wire into the hole in the donut to hook it on the frame.
Carefully bend and insert the ends of the wire from the back to the front through the loop at the top. Trim the ends of the wire to about 3/4-1 inch.
Keep the wire frame close to the donut. It is helpful to create a small bend inward with your flat nose pliers at the point the the wires meet the top of the donut. Hold the wires tight against the donut with your fingers on both sides of the donut. Make another small bend of about 1/8″ at the end of the wires facing towards the back.
With your round nose pliers or small mandrel, create a loop facing the back of the pendant. Keep shaping this loop back until it closes against the frame. It does not need to be rounded. It can be triangular and work just as well, just make sure there are no gaps in this closure or sharp edges sticking out. If there are sharp edges, file them down with a needle file.
Your bail is finished! You can oxidize it or leave it as is.


Zoraida, thank you so much for posting this wonderful donut bail tutorial. This is the best one I have seen, but, of course, it is your great quality. If that makes sense. Thank you again.
Thank you Donna! Donuts are such a simple, great jewelry element. I think they’re often under rated. They look awesome on men, women and children. I’m always looking for a way to dress them up.
Well, this bail is just perfect. Makes a statement without being over or under. Lately, I have seen wire wrapping that is so over wrapped. Just my personal opinion.
I agree with the over wrapping, Donna. I’m not a fan of it. Sometimes a beautiful stone looks like it’s smothered beneath a tangle of wire, struggling to get free 🙂
You are absolutely right. Good description. I just finished a custom pendant and merely swirled the wire on both sides freeform, or that is what I call it, and my customer loved it.
I’m sure the pendant was perfect. Sometimes it all about the stone, the pendant or whatever is meaningful to the “customer”.
That’s simple and simply gorgeous! Thank you!
Thank you Kashmira for your gracious comment 🙂
I really like when you create a tutorial because it is classic.
Thanks again, Donna. I am very flattered 🙂
Wonderful tutorial. Thank you so much.
Thank you Candy! I hope you try making one of these bails when you have a donut you don’t know what to do with 🙂
Wonderful tutorial, Zoraida! I will feature it on my blog so readers can come visit!
Thank you, Pearl ! I love your blog 😀
Thank you for such a great and easy tutorial.
Thank you for the compliment, shesacraftyone !
Well I am no expert when it comes to wire work, but have been looking for away to make a nice bail for the donuts in my stash and, at last I have found something I can achieve as well as something that looks good. I managed on the second go to do this bail and it looks really good. Thanks for sharing this it is wonderful.
Thank you, Shazanne. I’m so glad you liked making it. I wanted to create a bail and tutorial that would be easy and just a little bit dressy 😀
Thank-you!!! You made it look so easyyyy!!!!
Thank you, Lynn. It is easy! It only takes practice to make your weaving nice an even. Good luck 🙂
I am definitely going to try this. I have tried to dress up my wire wrapped bails for my old jade bi coins (similar to the donut gems) and I need to vary my techniques. Thanks for offering the tutorial; this means I can try to improve my simple wire wrapping.
Thanks so much Anna! It’s wonderful to hear from you. I am honored, really. I hope you enjoy using my tutorial 😀
Thank you for being so generous. I love you ideas, sharing and caring. Continue on your creative path!
Thank you Bev 🙂
Reblogged this on jasmineandvioletsblog and commented:
Great free tutorial from Zoraida, for those pesky donuts lol. I can never figure out what to do with them.
Thanks for reblogging 🙂