Funnels 201: Exploring Advanced Features

We briefly touched upon the many capabilities of our Funnels feature in a prior post, and today we are going to explore a few advanced options of Funnels available to our publishers.
*Please note: If you are currently not using a Funnel with your email marketing, please read both our introductory post and our post on creating your first Funnel before continuing.
Setting Triggers for Funnels
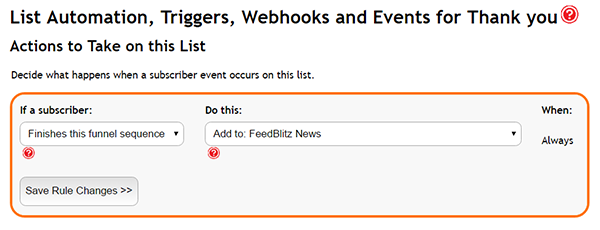
We’ll start with something simple, adding a trigger to your Funnel. A trigger is an event that sparks a secondary action. When working in FeedBlitz it’s helpful to think of triggers as an “if this, then that” situation. For example, if you would like a subscriber to be added to your main list after finishing the Funnel, you can use a trigger to automate the process.
Select the Funnel from your Dashboard you would like to work with and scroll down to Subscriber Management.
Select Triggers and you will receive the following pop-up:
From here you will be able to select the actions taken and completed. This eliminates the need to manually move subscribers between lists when they meet the specified criteria.
Adding Tags to Funnel Subscribers
When working with Funnels, you may find yourself wanting to quickly sort subscribers based on their subscription history, choices or actions. This can easily be setup by using our tagging feature. Tagging subscribers can also better help you segment your subscriber list as well as target particular subscribers for advanced email marketing and product offers.
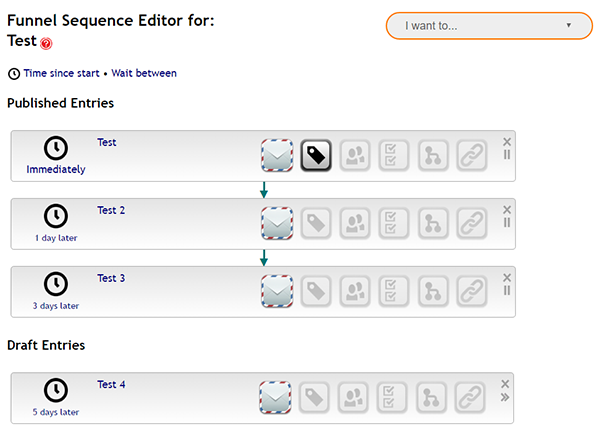
To tag a subscriber you will first need to create a hidden custom field. A refresher on how to do that can be found in our prior blog post here. Once created, select the Funnel your would like to work with and click the light grey Edit Articles and Sequencing button to be taken to the following screen:


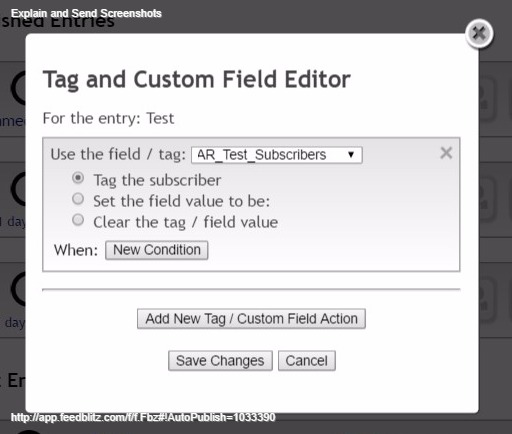
From this screen, you will press the tag icon next to the email icon on the step of your series where you wish to add the tag. When you click the icon, a pop-up will appear which you will be able to select the Custom Field from the drop down menu. As this Funnel series was created as a Test, we created the hidden Custom Field of AR_Test_Subscribers to tag to all subscribers.
Your subscribers will not be aware of the tag as it is solely used for publisher tracking purposes. You are able to add a tag at any stage of your Funnel, this is useful if you are noting when subscribers drop out of a particular series.
You are able to use these tags when segmenting subscribers for new mailings or when creating new lists and groups.
Pro Tip: Automatically add subscribers who complete the Funnel into a new Group for targeted email marketing. You can do this by selecting the group icon next to the tag.
There are times where you wish to start a Funnel for a set of subscribers at the same time. It could be an ecourse or a bootcamp where you want everyone to move at the same pace. To do this, follow the steps below:
-
Set up a new list, set to the On Demand schedule, as a placeholder. This list’s only job is capture the subscribers as they sign up for your product or course.
-
Prepare the Funnel separately, making sure that the first email has a delay.
-
*If the first email in a Funnel is set to immediate, it will not be sent to people who do not sign up directly to the Funnel.
-
-
When ready to begin the series, use the Move / Copy feature, found in the subscriber management tile of the placeholder list, and copy everyone into the Funnel.
Jumping Emails in a Funnel
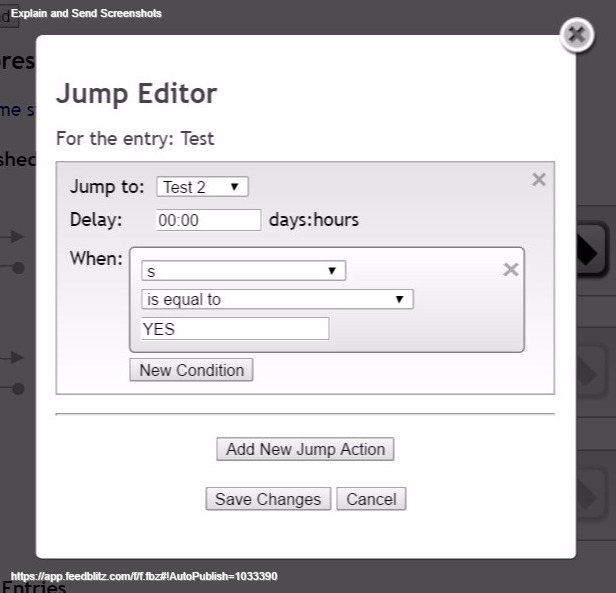
There are cases when you may want to speed a particular subscriber through a Funnel. To do this, first you will want to create a Custom Field, such as Jump, and then manually tag the particular subscriber with this field under Subscriber Management. Before adding this subscriber to the Funnel, you will need to add the Jump to each step in the series. When you select the Jump icon, the following popup will appear:

For this purpose, we simply used the custom field of “ s “ to note a skip. This signals the Funnel to Jump from the first email to the second email when the Custom Field of s is equal to YES (i.e. when it has been found on an email address).
Please note that in order to successfully move through an entire Funnel sequence, a jump will need to be added to each step along the way. You can also use a jump to skip further along the sequence if they take a specific action.
Here you can see we have zero delay set, but you are able to set your delay between emails as you please. This is useful if someone requests all of the emails in a series up front, or prefers a weekly delivery series to arrive on a daily basis. Our publishers have found this is not common, but should a subscriber request it, it can indeed be done.
Diving into the advanced features of Funnels can seem overwhelming, however, we are always here to help! If you would like to work with some of the features mentioned above but would like further assistance, send us an email to support@feedblitz.com. Or you can chat, check out our Help Forum, or give us a call at 1.877.692.5489. Our Support and Sales Desk is available Monday – Friday from 9 am to 5 pm EST.
Did you find this post useful? Let us know! We enjoy hearing feedback on how we can better serve you. Send an email with your thoughts to support@feedblitz.com. Thank you in advance as we look forward to hearing from you!
-•-
Easy enough for a blogger to set up in seconds, powerful enough for sophisticated corporate email campaigns, FeedBlitz is an RSS, Email and Social Automation Tool to take your email marketing to the next level. Visit us online to learn more or start your 30 Day Free Trial!


