Microsoft has officially opened access Windows 10 support for the Raspberry Pi 2 as of last night — coming through on their February announcement that they’d be offering the OS for the diminutive computer. With the installed release, you can now build and deploy apps from a Windows 10 PC running Visual Studio.
The B15 robot, shown above, is powered by a Raspberry Pi 2 running Windows along with an Arduino. It made an appearance at yesterday’s BUILD keynote, and merged with a Hololens overlay that the audience was able to see through some camera magic.
We took a few hours to go through the setup so we could take Windows 10 IoT Core for a spin on Raspberry Pi; here are our initial impressions and notes.
Before You Get Started
You’ll need to be running the Windows 10 Insider Build before you can develop or deploy code to the Pi. You can sign up for free at the Windows Insider Program. Download and install the latest build, and get settled into your shiny new operating system.
Next, you’ll need to install the free Visual Studio 2015 Preview. Once that’s up and running, you’ll have everything you need on your PC to start playing with Windows 10 IoT Core on Raspberry Pi 2. When you install the preview, be sure to do a custom install and choose the Tools and Windows SDK for Windows 10.
Note: If you receive the error “Windows 10 SDK 10.0.10069 : The installer failed. User cancelled installation”, don’t worry… you didn’t cancel the installation. But you have tripped over a known problem with the preview. If this happens, download and install the Standalone Windows SDK for Windows 10 from the Windows 10 developer tools preview download page.
Windows 10 IoT Core apps are based on the same Universal App Platform that powers apps on phones, tablets, PCs, Hololens, and other Windows-10 powered devices. Earlier today, Microsoft’s Terry Myerson announced their intention to bring the Windows 10 app platform to 1 billion devices by next year. Getting Windows on Raspberry Pi 2 is a big step toward making that real.

Set Up the Raspberry Pi 2
Head over to Windows IoT and choose Raspberry Pi 2. Follow the instructions on the Raspberry Pi page to:
- Download the Windows_IoT_Core_RPI2_BUILD.zip file and extract it. If you see an empty list of downloads on the download page, follow the instructions at the top of this page to sign up for the Microsoft Connect program.
- Use the dism.exe command shown on the setup page to deploy the image to the card. You cannot write the image to the card using dd or any other disk imager; it will not work because dism prepares the partitions on the card as well as copies files.
- Install the SD card, connect your peripherals, and plug your Pi into the same Ethernet network that your Windows 10 computer’s connected to. If your computer has an Ethernet port, you may be able to connect them directly. The PC setup page, which should be your next stop, has some tips on configuring connection sharing if you do a direct Ethernet connection between your PC and Pi.
Note: The PC setup page will tell you to install Windows 10 Insider Preview and Visual Studio 2015 RC. If you’ve done that already, you just need to install the WindowsDeveloperProgramForIoT.msi file and configure networking between the Pi and the PC, both of which are explained on this page.
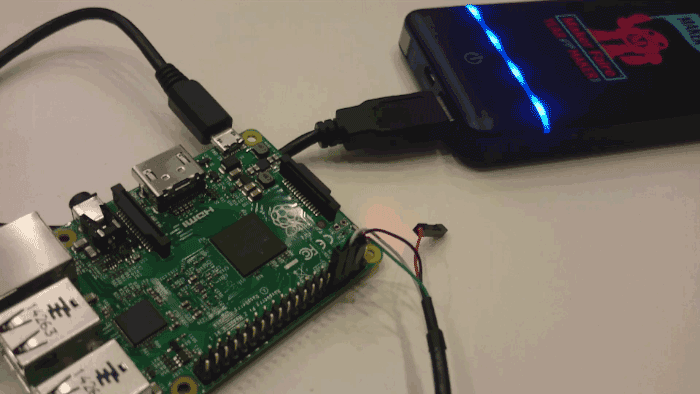
The first time you power on the Pi, the activity LED will flash for a few seconds, then stop for a couple minutes. After Windows finishes its initial configuration, the LED should start flashing again, and you should see the Ethernet link lights come on as well.
You are all set up now: you’ve installed Windows 10 Insider Preview on your PC, along with Visual Studio 2015 Release Candidate, the Windows 10 SDK, and WindowsDeveloperProgramForIoT.msi package. If your Windows machine can see the Raspberry Pi, you’re good to go to the next step, Blink an LED.

Blink an LED
You’ll want to download all the samples from the MS-IOT Github repository. After you have them downloaded and unpacked on your hard drive, navigate to the Blinky->CS subdirectory to find the C# Blink example. Double-click Blinky.csproj to open it in Visual Studio. You may get a warning about opening projects from random places on the Internet. Toss caution to the wind and open it up! Next, do the following:
- In the Solution window, open the Mainpage.xaml folder and double-click the Mainpage.xaml.cs file to open it. This is the main program, and you’re going to make a change to it:

- Scroll down to the bottom of the file, and change the value of LED_PIN to 47. This is the onboard activity LED, and saves you from having to connect an LED (you can do that later if you’d like!):

- Next, look for the toolbar options to the right of Debug. Make sure that ARM is selected, and change Device to remote machine. If your Pi doesn’t appear in the list, paste in its IP address here and change Authentication mode to None, then click Select:

- “Device” will change to “Remote Machine” in the toolbar. Click the green play button to the left of “Remote Machine”, wait a bit, and your onboard LED should be blinking!


When you downloaded that Github repository, you got a bunch more examples to play with. Happy hacking!
ADVERTISEMENT
Join Make: Community Today