Powered by Blogger.
Showing posts with label Verve Stamps. Show all posts

Hope Art Journaling

Today I thought I'd pop in with a little something different. I was revisiting a technique for a card I can't show quite yet and it didn't turn out the way I expected. I decided to look back at the first time I tried the technique to see what the difference was. If you're curious, the difference was white space, which my new attempt had none. Go figure! 😁

Anyhow, this is the project I looked back on. It's an art journal page I made a little over a year ago. I struggle with depression and the past few years have been pretty hard in my little mind castle. Nowhere near as hard as so many dealing with devastating circumstances, but still impactful nonetheless.


Creativity is one of those things you can't force. It has to flow from your heart to be meaningful. You can practice and practice and you can go through the motions and create something that's pretty, but without the heart and soul of the piece, it's just a shallow prettiness. Not that soul-cleansing kind of beauty that shines deeper. Not the kind that ignites your worn out soul and makes you want to create more and more. I think I'm finally getting to a place like that again, but it's taken over a year and the closing of my business to get there. Marching ever forward, my friends. Ever forward.


When I sat down to art journal this page all those moons ago, I was feeling blue. I hadn't art journaled in quite some time. I absolutely love it, and keep telling myself I should make time for it way more often!  I had recently seen an acetate smooshing technique with magical powders on Instagram and decided I wanted to give it a go. I even set the camera up to record the journaling process, but my computer decided to corrupt the file when I imported it and deleted the original at the same time.  Technology 1... me 0.

The pages are treated with heavy gesso and then I used a stencil and light paste for some texture.  Next I sprinkled on the powders, then spritzed the acetate and blotted it on the pages, smooshing it down and adding more powders and re-applying the watery acetate until I achieved the background I wanted.


The only word that kept coming to me was hope and it made me think of this Emily Dickinson quote. So I pulled out the old Verve Hope Perches plain jane and stamped in archival ink on some pretty Prima packaging I had laying around. Next I found some feather ephemera in my stash and mixed up some of the magicals powders with water to watercolor the feathers, then also added a bit to the sentiment piece and layered them onto my page.


Next I found the word hope in an ephemera pack along with those little monochromatic chevron pieces and as luck would have it they totally matched the layout.  I added them, then did a little accenting with black and white pens to incorporate them into the page.  I finished with another bit of packaging that I journaled on and stamped the date.

Thanks so much for stopping by today! I hope you found a bit of inspiration here.

Any Day

Hi friends! It's the final day in June, and that means my run as a stamp company owner comes to a close today. What a fabulous run it has been and made a huge, indelible mark on my life. Thanks for your part in my journey!


Today's card uses some flowers I had already colored a week or so ago using the Blooming printable that comes free with purchase of the Blooming Die Set. I paired them with a sentiment from the Love From Me DIGITAL Set. The flowers are colored with clean color real brush markers and blended with a clear wink of stella glitter pen.

The background is actually a piece of cardstock I used to clean up my stencil after doing a distress oxide blending technique on another card. I liked the look, and added a skewed panel of black for some drama.


Thanks so much for stopping by today! I hope you have a wonderful weekend!

Enabler's List
Stamps: Love From Me DIGITAL Set, Blooming printable (Verve Stamps)
Paper: white, black
Ink: laser printer, clean color real brush markers (Zig Kuretake), wink of stella glitter pen (Zig), pecock feathers distress oxide (Ranger)
Accessories: Blooming Die Set (A Cut Above by VERVE), stitched circle dies (MFT), enamel dots (BoBunny), rhinestone bumps, Woven stencil (Prima - Amazon affiliate link)

America the Beautiful Geared Up for Fun

Hi friends! I'm back today with a couple of projects. I got a little chance to create and decided to finish up some half started projects that have been patiently waiting for me to finish them up.


First up is this America the Beautiful mixed media tag.  The sentiment and cups are from the Land of Liberty DIGITAL Set. The tag is a kraft tag that I coated with two coats of heavy gesso, then played around with some red, white and blue Impasto paints.  I splattered some of the paints on the sentiment and accented with a couple of rhinestone stars.  The cups were colored with Arteza real brush markers and then highlighted with a white nail art pen.  I finished off with some ribbon remnants from days gone by.


The second card is a fun birthday card for one of the boys' friends who has a birthday coming up in July. I watercolored the robot from Geared Up with Prima oil pastels and a waterbrush.  Then I fussy cut him and added a few accents with a silver gel pen.  The sentiment is stamped on a circle die cut and I stamped one of the gears from the set tone on tone behind for a little accent.  The gear dies are from a Tim Holtz Bigz die.  The background is randomly stamped in grey with an assortment of the gear images in the set. I love it for a background!  I finished off by stamping a number 6 to accent one of the gears.


Thanks so much for stopping by today and for your sweet, sweet comments of encouragement on yesterday's post. I puffy heart you all!


Enabler's List
America the Beautiful Tag
Stamps: Land of Liberty DIGITAL Set (Verve)
Paper: white, riding hood red (SU!), kraft tag
Ink: laser printer, real brush markers (Arteza - Amazon affiliate link)
Accessories: Rounded Rectangle Die (A Cut Above by VERVE), white nail art pen (Sally Hansen - Amazon affiliate link), ribbon (Creative Impressions), corner rounder, Impasto paints (Prima)

Geared Up Card
Stamps: Geared Up (Verve)
Paper: smoky slate, island indigo, lucky limeade (SU!), white (Neenah)
Ink: lucky limeade (SU!), grey (Altenew), black (Hero Arts), silver gel pen, water soluble oil pastels (Prima - Amazon affiliate link)
Accessories: Gadget Gears Bigz Die (Tim Holtz Alterations - Amazon Affiliate link), circle dies (spellbinders)

The Brave Thing To Do

Hi friends! There are so many thoughts swirling through my head today. The boys have finished Montessori school and summer is officially here and Verve closes for good this weekend. I don't deal well with transitions and usually avoid them at all costs and now there are transitions going on in pretty much every part of my life all at once! Ack!

One of my favorite movies is You've Got Mail and I always cry when Kathleen closes her shop. ALWAYS, always, always. I'm not sure I can bring myself to watch this movie right now, but I do remember a wonderful little scene that makes my heart feel a bit lighter today.

"Closing the store is the BRAVE thing to do...I know you don't feel it right now, you feel like a big, fat failure... but, YOU'RE NOT! You are marching into the unknown armed with.... nothing."  

Big, fat failure. How is it that we always see our failures so much clearer than our successes? One of my reasons for closing Verve is that overwhelming everyday feeling of failing at juggling being both a Mom and a business owner. Both are exceedingly tough, very rewarding, full-time jobs that are exhausting in their own right. I'm a very private, self-sufficient perfectionist, and I have a ridiculously hard time asking for help when I need it. RIDICULOUSLY hard. Crazy stuff like not sleeping and having intense panic attacks just to send an email to ask someone to be a guest designer. Crazy, right? Silently suffering through panic attacks, depression and heartbroken, soul wrenching emotions have been my companions the past few years of trying to balance a creative business and motherhood and it's time to lighten the load. So I do consider it the BRAVE thing to do to close my shop when I could continue going through the motions for many more years. I am marching into the unknown armed with nothing but my faith, my family and 11 years of memories from running a very loved business created from my heart. Seems like a lot more than nothing, don't you think?

I had intended to make a card for today, but the boys wanted me to play Monopoly Star Wars, and War and read Darth Vader and Son, and take them bowling and watch The Empire Strikes Back (sensing a theme?) yesterday and I just couldn't say no on their first day of summer break.  So I'm just highlighting a few cards from times gone by using the three sets that are still left in the shop.  All remaining stamps and dies are 75% off and Saturday is the final day!


This card uses sentiments from Geared Up and a robot image from Birthday Bots, but you could easily just substitute the robot in Geared Up to make the card. I added some Mickey Mouse punched shapes and drew in some balloon strings by hand for accent. I absolutely love using the numbers in this set for birthday cards. And the gears images make for an easy randomly stamped masculine card or steam punk background.


This card uses the Twitterpated stamp set. Love the sweet little butterfly, which I colored and then coated with glossy accents and a sprinkling of glitter. The sentiments are perfect for adding to a heart die cut or making a little sentiment banner. Such a sweet little set and I'm especially fond of the Hearts & Swirls frame in the set.


And finally, here's a favorite card I made with the Pinecone Christmas stamp set. No fancy coloring here, just embossing in gold on cream cardstock and layering with some circle die cuts.  Classy and elegant, this is one of my favorite Christmas sets. I also love the card below, where I used the pine branches and pinecone images and my MISTI for a watercolored stamping effect.


Thanks so much for stopping by today and listening to my rambling heart. Hope you have a wonderful day!

Pink Snowflakes and White Space

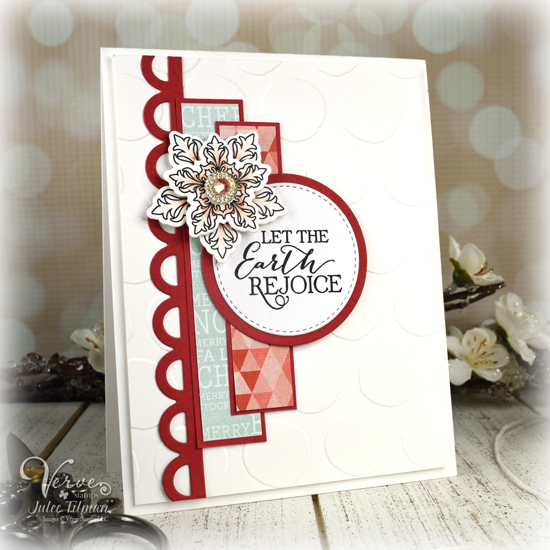
Hi friends! I'm popping in again today with a couple more quick Christmas cards I made this weekend before packing all the Christmas goodies away again.  The snowflakes are printed using the Snowflake Tidings Printable that comes with purchase of the Snowflake Tidings Die Set.


I colored the snowflakes with  a watercolor pencil and blended with a clear wink of stella glitter pen, then cut with the coordinating Snowflake Tidings Die Set.  I layered the two sizes of snowflakes together and accented with a fun rhinestone embellishment.

For the layouts, I just played around with scraps of paper and a Lacey Trim Duo die cut that were on my desk until I got something I liked. The silent night sentiment is from the Winter Peace DIGITAL Set and the let the earth rejoice sentiment is from the Christmas Blessings DIGITAL Set.


I embossed each background with a different embossing folder to add a little texture to the white space.

Thanks so much for stopping by!

Enabler's List
Stamps: Winter Peace DIGITAL Set, Christmas Blessings DIGITAL Set, Snowflake Tidings Printable (Verve)
Paper: Sugar Plum (My Mind's Eye), riding hood red (SU!), white
Ink: Julie Nutting watercolor pencils (American Crafts), laser printer, wink of stella clear glitter pen (Zig)
Accessories: Snowflake Tidings Die SetLacey Trim Duo Die Set (A Cut Above by VERVE), rhinestones, circle and rectangle dies (Cottage Cutz), snowflake embossing folder (Tim Holtz), polka dot embossing folder (Park Lane)

More Holiday Cards

Hi friends! While I was working on my tags for yesterday's Keeping Christmas blog hop, I ran across a bag filled with cut and colored digitals that didn't make it onto cards last season.  I had a bit of time, and decided to make a few more cards before I stuffed all the Christmas goodies back in the closet for another month.


I loved these two papers from the Sugar Plum collection, so cut them to 4 x 5.25" for the back panels, then used the remainder for the horizontal strip on each card.  I added some riding hood red mats and a border from the Lacey Trim Duo Die Set to give a little contrast, then got to work layering everything together.


The sentiment for the first card is from the My Cup to Yours DIGITAL Set and had already been foiled with my Minc machine in silver.  I accented with the three holly mugs... one from the Good Cheer DIGITAL Set and the others from Holiday Sweets DIGITAL Set.  A little stickles on the berries and whip cream and that card was done. I wasn't able to capture the shiny silver Minc foiling in this photo, but did capture it on the top photo.


The second card uses the cupcake images from theHoliday Sweets DIGITAL Set. and a sentiment from the  Good Cheer DIGITAL SetI matted the sentiment and added the cupcakes to finish off this super easy card.

Thanks so much for stopping by today! I hope you have a fabulous Tuesday. The boys have their Kindergarten graduation this morning so there's sure to be tears as we say goodbye to the fantastic teachers who have poured their souls into our little boys for the past 3 years. Isn't their graduation portrait adorable? 💓 💓 💓  So proud of these boys!


Enabler's List
Stamps:  Holiday Sweets DIGITAL Set.Good Cheer DIGITAL Set, My Cup to Yours DIGITAL Set  (Verve)
Paper: Sugar Plum (My Mind's Eye), Riding hood red (SU!), white
Ink: laser printer, Copic markers, wink of stella clear glitter pen (Zig)
Accessories: Lacey Trim Duo Die Set (A Cut Above by VERVE), circle dies (Cottage Cutz), stickles

Keeping Christmas Tags

It's the 25th of the month and time again to join some of my crafty friends for our monthly Keeping Christmas Inspiration Hop! The idea of the hop is to both to bring you a little dose of holiday inspiration throughout the year and also have some Christmas cards and projects in our stash all ready to go for December 2018. If you've already been hopping along, you should have arrived from Claire's blog. If you're just popping in, read on for all the details!

Updated photo. Capturing the foil shimmer without losing the white balance is tricky. :)


I can't believe we're already half way through the year! I've been a little heads down this month preparing to close Verve for good on June 30th. So when the reminder popped up for this hop, I was taken by surprise once again!  LOL  How can I forget every single month? Maybe I'll be a little less forgetful in my "retirement"! Haha!

Anyway, for my June installment, I decided to do some pretty tags to add to handmade gifts. The pretty plaid paper is from the Prima Sweet Peppermint collection. I recently added some printable PDFs with purchase of our remaining die sets that no longer have coordinating stamps, so was pretty excited to pull our my Minc machine to do some foiling on these snowflakes that come with the Snowflake Tidings Die Set. Foiling is the equivalent magic of embossing to me, so I just *might* have gotten distracted and foiled and die cut an entire sheet of snowflakes! So. Much. Fun.

Keeping up with my quest to start using the mountain of blank tags I keep accumulating, I pulled out a couple of tags, cut the plaid paper to 2.5" x 3.25", then inked the edges of everything with antique linen distress ink and glued them together. Next I inked up my foiled and die cut snowflakes and added some flowers from my stash to the centers.  I cut a border of white using the Lacey Trim Duo die set, sponged with antique linen and cut to the size of the tags for the bottom border.  I wrapped some pink & white divine twine around the top four or five times and then tied in a bow.


The sentiments are printed from the Winter Peace DIGITAL Set and die cut with stiched dies, before adding to the tags. I topped them with long twine strings so I can tie them onto gifts come Christmas time.

Okay, now it's time to hop along and check out all the other fabulous posts on the hop. I'm so excited to hop along and see everyone's creations! The hop is hosted on the fabulous Kelly Lunceford's blog, so head over there to start from the beginning. Or continue on to visit Lori Tecler if you've already been hopping along!


Lesley Croghan (taking a break)
Anita Madden (taking a break)
Julee Tilman {You are here}
Kim Heggins (taking a break)

Thanks so much for stopping by!


Enabler's List
Stamps: Winter Peace DIGITAL Set, Snowflake Tidings Printable (Verve Stamps)
Paper: Sweet Peppermint (Prima), white, blank tag
Ink: laser printer, antique linene (Ranger Distress)
Accessories: Snowflake Tidings die set, Lacey Trim Duo die set (A Cut Above by VERVE), stitched dies (Cottage Cutz), flowers (Wild Orchid designs), pink baker's twine (Divine Twine), pink Minc foil and Mini Minc machine (Heidi Swapp)

A Shabby Little Tag

Hi friends! I'm popping in today with a shabby little tag I made while I was playing around with the Arteza brush markers earlier this week.


The butterfly and sentiment are from of the printable PDF that comes with purchase of the Lifted Hope Die Set  After coloring and die cutting the butterfly, I circle cut the sentiment, then mopped up a bit of the extra ink I had on my craft mat to give it a pop of color. Next I pulled out a tag from my stash and started stamping randomly with the script and splatter stamps from the Texture Tiles 1 stamp set from Sweet 'n Sassy stamps. I absolutely adore this set! It's perfect to add a little oomph to any background.


I sponged everything with antique linen distress ink for a vintage feel and added a black circle mat and a border from the Lacey Trim Duo Die Set for accent, then finished off with some Prima flowers and some ribbon from my stash.

Thanks so much for stopping by today! I hope you have a fabulous start to your weekend! If you haven't checked it out yet, there are still a few items in the Verve shop, and all remaining stamps and dies have been reduced to 75% off.


Enabler's List
Stamps: Lifted Hope printable PDF (Verve), Texture Tiles 1 (Sweet 'n Sassy)
Paper: smooth briston (canson), basic black (SU!), tag
Ink: laser printer,  seedless preserves, antique linen, tattered rose (Ranger Distress), real brush pens (Arteza - Amazon affiliate link), wink of Stella clear glitter pen (Zig)
Accessories: Lacey Trim Duo Die Set, Lifted Hope Die Set (A Cut Above by VERVE), paper flowers (Prima), circle die cuts, ribbon

You Got This

Hi friends! I'm popping in today with probably the most "mailable" card I've made in a long, long time. Haha. Absolutely no dimensional tape was used in the making of this card! I love me some dimension with all the bells and whistles, but also admire and desperately hope to get better at a cleaner style, too. Sometimes it's enough to let the ink and paper do the talking, right?


This card started out with a little experimentation. After watching Tiffany's Arteza video review, I recently purchased the 96 count Arteza real color brush pens. I've been using my Zig clean color markers more lately, but was feeling very limited in the 36 colors I had. Not long after I watched the video, Amazon had a lightning deal on the Artezas for $60 and I just had to get them. With some rewards I had been saving for a rainy day, it brought my out of pocket cost to just $13, so it was a no brainer to give them a go. Here they are all swatched out with a water brush. 💓💛💚💙💜


My first attempt coloring with them was less than stellar. Once I realized I had printed on regular cardstock and not the smooth bristol, I knew what the problem was and had to give them another go.  Here I used a butterfly from the Lifted Hope printable that's free with the purchase of our Lifted Hope Die Set and colored with pinks and purples. Side note: if you've already purched this die set and would like the printable, just email me at info at vervestamps dot com and I'll send the link.   Okay, on with the art stuff... I will say that the results with the Zig brush pens is a tiny bit better. They seem to stay wet a little longer and one color blends with wet medium are better than with the Artezas. But the Artezas do blend well with each other and with water, so I found myself blending dark to light and then using the wink of stella pen to soften. The brush tips aren't quite as nice and I've had to snip a few stray hairs, but overall I'm really happy with my rainbow of new markers!


Once my butterfly was colored and cut, I wanted a fun background, so took the pens I had colored with and scribbled onto an acrylic block to do a watercolor background. I taped off a rectangle of watercolor paper, then started plopping on color with a large very wet brush. It was quite a bit of fun, but I wanted just a bit more vibrance so I plopped in just a touch of crushed grape dylusions spray at the end and love how it turned out.  Once it was dry, I flicked on some dylusions white paint and a bit of my leftover ink.

I had intended to use the sentiment from the printable, but couldn't bring myself to cover up that pretty background. So I reached for the brand new Coffee Talk 2 set I just picked up from Lil' Inkers Designs. It's got lots of fabulous coffee themed sentiments, but I went for the "you got this" sentiment, as it's been my mantra these past few weeks as I'm working towards the final days of Verve.  I've got another fun thing in the works with the Hope sentiment and that other butterfly, though! Just need to photograph it. 


Thanks so much for stopping by today! I hope you've found a bit of inspiration here and have a fabulously creative rest of your day.

Enabler's List
Stamps: Coffee Talk 2 (Lil' Inkers Designs), Hope Printable (Verve)
Paper: smooth bristol, watercolor paper (Canson), basic black
Ink: laser printer, intense black (Hero Arts), Real brush pens (Arteza - Amazon affiliate link), Crushed Grape spray, white linen paint (Dylusions/Ranger), Wink of Stella clear glitter pen (Zig)
Accessories: Lifted Hope Die Set  (A Cut Above by VERVE)

Three Cheers

Hi friends! Three cheers for a new card.  Last Friday, I uploaded a few new and new-ish digital sets to the shop.  A couple that had been on my calendar to reintroduce/redesign, and one that partially came from a set I had designed to release in stamp form, before plans changed.


That set is the  Land of Liberty DIGITAL Set, which I used today. I pulled out some patriotic papers and started layering until I had a layout I liked.  Then I added the cup, which I colored with Arteza real brush markers. I forgot to pint on smooth bristol, so the blending with the markers was terrible.  But I was snuggled up on the couch with a sick boy while coloring, so didn't bother to reprint.  I did eventually pull out some copic markers to help even out the coloring a bit and it turned out okay in the end. The sentiment is also from Land of Liberty and I cut it out with the Rounded Rectangle Die. I finished with a border cut with the Lacey Trim Duo Die Set and a couple rhinestone stars to accent the mug.


Thanks so much for stopping by today. The sickness Kellan caught seems to be taking over the family one person at a time. :(  The boys graduate Kindergarten one week from today, and I'm thinking there might not be much school for them between now and then!

If you haven't already, click on over to Verve and check out our final new digital sets.


Enabler's List
Stamps: Land of Liberty DIGITAL Set (Verve Stamps)
Paper: Yankee Doodles (WRMK), white
Ink: laser printer, real brush markers (Arteza), wink of stella glitter pen (Zig), Copic makers)
Accessories: Rounded Rectangle Die, Lacey Trim Duo Die Set (A Cut Above by VERVE), rhinestone stars

If Not for the Last Minute

Hi friends! I'm popping in with this quick little Father's Day card I made last night. I don't know how I always seem to be one card short the night before a holiday, but somehow it always happens. Kellan has been super sick and so I colored the duck image from Just Like You with copics while I "watched" Treehouse Detectives with Kellan.


After coloring, I ran upstairs and die cut the sentiment and the colored image, matting with black circle die cuts.  For the layout I went with a paper that had some of the orange of the bill in it, then picked another orange paper and cut with the Flourished Tag Die Set. I cut one more tag die from black and offset it to give it just a thin mat at the bottom, then layered everything together and was on my way. Probably one of the quickest cards I've ever made.

I'm taking Trevor to our family get-togethers today and Mark is staying home with a feverish Kellan. He gets the Dad of the Year award for spending a good portion of Father's Day weekend mopping up vomit. Hope this is something Kellan doesn't share with the rest of us!


Thanks so much for stopping by today! I hope you have a fabulous day.

Enabler's List
Stamps: Just Like You (Verve Stamps) - now Just Like You DIGI (SNSS)
Paper: For the Boys (Echo Park), black, white
Ink: intense black (Hero Arts), copic markers
Accessories: Flourished Tag Die Set (A Cut Above by VERVE), circle and stitched circle dies

Hopping By

Hi friends! I'm hopping in with a quick little card I made with a sentiment from the Hip Hop Bunnies stamp set and the Wings & Petals Printable that is free with puchase of the Wings & Petals die set. These butterflies have always been a favorite of mine. The release that they were originally in back in 2008 was a turning point for me. It was the first time I started to feel like I was a "real" artist.


We had hired a local graphic designer to redesign our logo and complete a branding package when we switched our name from Verve Visual to Verve Stamps. Let's say it was an epic fail. The gal was late, did not complete any of the designs we had discussed and when she finally sent a working proof of the logo it was nothing usable. That's when I realized I really should just do it myself. Unfortunately, the gal made me pay up front and we never received anything for our money. A tough lesson learned, but I dug in and created our logo myself and then designed our new packaging , which I still love 10 years later (a few little tweaks through the years, but still basically the same).

Anyhow, the butterflies are colored with Zig clean color real brush markers and a Wink of Stella glitter pen. I cut them with the coordinating Wings & Petals die set and then accented with  white enamel drops and some flatback pearls.

The sentiment is stamped on white, then cut out and accented with black enamel dots and matted with black. For the background I masked off a regtangle in the center, then stenciled the plaid layering stencil with squeezed lemonade and fossilized amber distress oxide. I thne did another layer with dot fade layering stencil in peacock feathers.  I added a thin black mat to the panel and finished off by layering it all together. Easy peasy and super fun!


In other news, I've been working on making printables for the dies who no longer have matching stamp sets, and I pulled together a few new DIGITAL sets that are available in the store and 55% off.  I haven't yet had a chance to create with them, but hope to do a little creating this weekend!


Land of Liberty is a completely new Americana themed set, which was slated to be a stamp set, but plans changed when I decided to close the shop. The smaller cups in this set coordinate with the Cup of Cheer Die Set. Three Cheers is a digital set we offered for a limited time in the summer of 2016, but I had planned to bring it back this summer. Coffee or Tea is a redesign of the popular One Cup stamp set, adding in sentiments for coffee lovers as well as tea lovers.  It also coordinates with the Cuppa Tea Die Set.

Okay, that's all for today! I hope you have a fantastic start to your weekend!

Enabler's List
Stamps: Hip Hop Bunnies, Wings & Petals Printable (Verve Stamps)
Paper: smooth bristol (Canson) Basic Black (SU!)
Ink: squeezed lemonade, fossilized amber, peacock feathers (Ranger Distress Oxides), intense black (Hero Arts), clear Wink of Stella glitter pen, Kuretake Clean Color Real Brush markers (Zig)
Accessories: Wings & Petals die set (A Cut Above by VERVE), plaid and dot fade layering stencils (Tim Holtz), flat back pearls, nuvo enamel drops, enamel dots

You Are Everything Nice

Hi friends! I'm back today with another colorful card using a mixture of Verve stamps, dies and printables. I hadn't made a coffee card in a bit, so thought it was time to ink up the cup from the Everything Nice set.  I stamped it in Intense Black by Hero Arts and then colored with Zig Clean Color real brush markers and a zig wink of stella pen.  I then cut it out with the coordinating Pumpkin Spice Die Set and gave the cream on top a bit of sparkle.


Total coffee side note, here... it finally looks like summer is coming with temps in the 90's yesterday and as good old Murphy would have it, the icemaker in my fridge decided to stop making ice! I mean doesn't it know it's prime iced coffee season?  What's a girl to do? I had to dig an old ice tray out of the garage last night. The boys were fascinated that you could MAKE ice yourself and wanted to know exactly how it all works. So we're kicking it old school with ice cube trays and I'm feeling like I've done one more thing to prepare my boys for life in the "real" world. Haha!

Okay, side note over. I decided to do a little mash-up to make the sentiment, masking off the  pumpkin spice and everything nice sentiment from Everything Nice and pulling in the "you are" part of a sentiment from the Simply Amazing set. I cut this out with a doily die, then started adding some printable images I've been coloring for #thedailymarker30day challenge. The leaves are the printable included with purchase of the Dreamy Leaves die set and the butterfly and flower are from the printable included with purchase of the Wings & Petals Die Set. I cut them all with their respective dies and then layered them together to finish my focal piece.


Next I went for a little mixed media technique on the background. I taped off a rectangle on a panel of white cardstock, then blobbed a little gesso on and sprayed a pump of London Blue dylusions spray on the gesso blob and blended it out with a paint brush. Once this was dry I took a stencil and some water and spritzed to lift some of the ink. I did this a few times, blotting off in between, but it wasn't quite giving me enough texture, so I spritzed some more dylusions spray over the stencil and then spritzed with water and worked it around.  It turned out super cool, but then my sentiment/image panel took up most of the card and is blocking the best texture. Oh well!

I finished with a thin black mat and a white card base.

Thanks so much for stopping by today. If you missed yesterday's post (I wrote and scheduled it for yesterday morning, but forgot to set it to publish, so it didn't publish until mid day), click here for another card.

Enabler's List
Stamps: Everything Nice, Simply Amazing, Wings & Petals Printable, Dreamy Leaves Printable (Verve)
Paper: white, black
Ink: intense black (Hero Arts), laser printer, Kuretake clean color real brush markers, clear wink of stella glitter pen (Zig), London Blue Dylusions spray (Ranger)
Accessories: Pumpkin SpiceWings & Petals, and Dreamy Leaves die sets (A Cut Above by VERVE), doily die (QuicKutz), painter's tape, nuvo glitter drops, gesso

All Your Wishes

Hi friends! I'm popping in today with another card using a Shimmerz paints background and a fun printable that's available with purchase of the Blooming Die Set.  As I have time, I've been adding printables for the dies that have sold out stamp sets. It's been a fun process, looking back at some of these sets and coloring the images again.


Here I colored the flowers from the Bloming Printable with Kuretake clean color real brush markers and a clear wink of stella glitter pen., then cut with the Blooming Die Set The background was made mopping up some of the excess paint from my last card. I embossed the sentiment from Everything Nice in white directly onto the panel. This is one of my favorite birthday sentiments. I matted the panel with a white stitched rectangle, then added a strip of pacific point behind to break up the whites.  Finished off with a embossed striped white card base.


Thanks so much for stopping by today!

Enabler's List
Stamps: Everything Nice (Verve Stamps) Blooming Printable (Verve)
Paper: smooth bristol (Canson), pacific point (SU!)
Ink: Versamark, clean color real brush markers (Kuretake Zig), wink of stella clear glitter pen (Zig), It's Mint to Be and Anchor's Away Shimmerz paints (Shimmerz)
Accessories: Blooming Die Set (A Cut Above by VERVE), stitched rectangle dies (Cottage Cutz), striped embossing folder (Cuttlebug), rhinestones

So Very Happy

Hi friends! I found a little time to create this weekend and it was so much fun.  I printed out some of the downloads I added to the Verve shop to go along with some of the dies that we still have in stock with no matching stamps.


My colored images here use the Beautiful Flowers Printable, available with purchase of the Beautiful Flowers Die Set, as well as the free Flutterby Printable available on the Flutterby die product page. I printed them both on Canson smooth bristol paper.  I colored them with Zig clean color real brush markers and a wink of stella glitter pen over the course of a few days for #thedailymarker30day challenge.

I wanted a splashy background, so pulled out some new Shimmerz colors I hadn't played with yet... Anchors Away and It's Mint to Be.  I plopped a bit of the Anchors Away on some cellophane packaging and then smooshed onto canson smooth bristol paper. I repeated with the Mint to Be color and then did some spritzing and smooshing with water and flicking with a paintbrush until I got everything how I wanted it.


I then stamped the sentiment from Wonderful Marvelous directly onto the background, but because of the thickness of the paint in the background, it didn't look as crisp as I like, so I stamped it again on vellum and embossed in black.  I cut this with a circle die and lined up directly over my less stamping and then layered the flowers and butterfly, cut with the Beautiful Flowers Die Set and the Flutterby die.  I tucked in some leaf die cuts (also from Beautiful Flowers die set), colored them with zig markers and then added some rhinestone and dew drop accents. A bit of distressing and a thin pacific point mat finishes it off.

Thanks so much for stopping by today. Hope you have a fantastic start to your week.

Enabler's List
Stamps: Wonderful Marvelous (Verve Stamps), Beautiful Flowers - now Forever Loved (SNSS), Flutterby Printable (Verve)
Paper: smooth bristol (Canson), pacific point, vellum (SU!)
Ink: Kuretake clean color real brush markers, clear wink of stella pen (Zig), It's Mint to Be and Anchors Away Shimmerz (Shimmerz Paints), Intense black (Hero Arts)
Accessories: Flutterby die, Beautiful Flowers Die Set (A Cut Above by VERVE), black embossing powder (Judikins), stitched circles stax (MFT), rhinestones and dew drops, paper distresser

A Blessed Life

Hi friends! I just logged on to post a new card and saw my last post and thought that it should have been titled SHIPPING and Relaxing instead of Sipping and Relaxing!  Haha! I've been shipping up a storm since my big announcement last Friday. Thank you to every one who has written sweet comments, emails and placed an order! I am so blessed by you! 💙


At some point in the shipping frenzy, I sat down and created a new digi sentiment to print and include in orders. Something that was reverberating through my soul as I packed each and every order.  If you ordered before I created this little sentiment, feel free to right click and save to your computer and use for your personal creating. If you use it, I'd love for you to share what you create! 🙂


For my card, I took one of the sentiments I had already printed to tuck in orders, rounded the corners and added some mats.  The paper is from a completely unopened pack of BasicGrey's Scarlet's Letter from the way way back. It has always been a favorite of mine, and I've been hoarding it! I thought about it because someone left a comment about feeling sick about Verve closing, and I remembered how gutted I felt when BasicGrey made the announcement they were closing.  So I decided it was finally time to cut into this pristine paper pack! I used it as a background for the card, adding the Lacey Trim Duo Die Set layered together in black to ground the sentiment a bit.


I'm working on adding printables of some of the images that we still have dies for but the stamps have sold out. The leaves here are an outlined version of the Elegant Leaves Die, and allowed me to do a little coloring for #thedailymarker30day challenge. The image was originally a solid one in Bloom & Grow. You can download a printable PDF of this image that includes registration marks for those old die alignment holes for free in the Verve shop.

I finished off with a pretty, glittery Prima flower.

Thanks so much for stopping by today! If you haven't checked out Verve's Shop Closing Sale, hop on over!
Enabler's List
Stamps: Elegant Leaves Printable, Blessed Life digi (right click and save above) (Verve Stamps)
Paper: Scarlet's Letter (BasicGrey), pearlized cream (Paper Accents)
Ink: laser printer, Copic markers
Accessories: Lacey Trim Duo Die Set, Elegant Leaves Die (A Cut Above by VERVE),  Santorini Ammoudi flowers (Prima), corner rounder